Getting Started
This document is part of the wercstat low-code framework (https://www.wercstat.com).
The following documents are available:
(1) Wercstat Overview: introduction to the framework
(3) Wercstat Value Types: description of Java domain value types
(4) Wercstat Server DSL: description of the server-side Domain Specific Language
(5) Wercstat Client DSL: description of the client-side Domain Specific Language
Getting Started
Installation
Minimum requirements
To develop software with Wercstat we have to install the Eclipse IDE and add the Wercstat DSL plugin.
Java11 (https://openjdk.java.net/install )GIT 2.2 (see https://github.com/git-guides/install-git )
Maven 3.6.0 (see http://maven.apache.org/install.html )
This can be checked on the command line:
java --version
git --version
mvn --version
Upgrade Java 20.0.2
cd /usr/lib/jvm
sudo mv /home/real2/Downloads/jdk-20.0.2 .
sudo mv /home/real2/Downloads/graalvm-jdk-20.0.2+9.1 .

sudo update-alternatives --install /usr/bin/java java /usr/lib/jvm/jdk-20.0.2/bin/java 1
sudo update-alternatives --install /usr/bin/javac javac /usr/lib/jvm/jdk-20.0.2/bin/javac 1
sudo update-alternatives --install /usr/bin/jar jar /usr/lib/jvm/jdk-20.0.2/bin/jar 1
sudo update-alternatives --install /usr/bin/jshell jshell /usr/lib/jvm/jdk-20.0.2/bin/jshell 1

sudo update-alternatives --display java
sudo update-alternatives --config java
IDE Setup
Step 1: Request an AWS login
All source code and artifacts are stored in Amazon Cloud and can be accessed using Amazon Web Services (AWS).
When your user account is created you will receive an email with AWS-console login-instructions, for example:
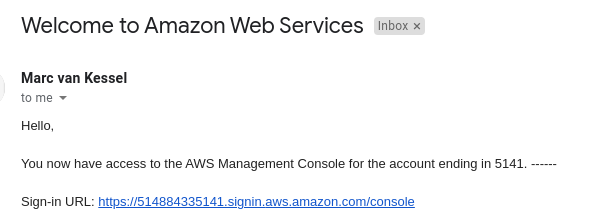
Activate the account and select region eu-central-1 Europe (Frankfurt).

Step 2: Install Eclipse
Next, setup the the development environment. Go to the Eclipse packages download page:
and download the Eclipse IDE for `Java and DSL Developers`

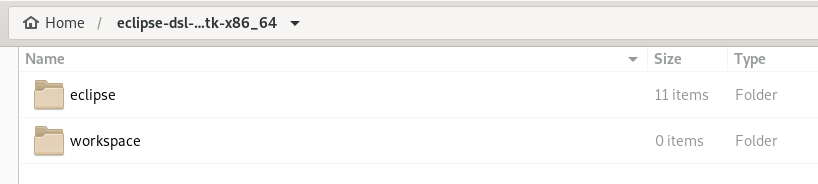
Unzip the eclipse package, this will create an eclipse directory.
Create an additional workspace directory for project software.
| IntelliJ IDEA support is under development |
Step 3: Install Wercstat plugin
Download the Eclipse plugin from the AWS artifact buckets.
Select Storage / S3 service and select buckets.
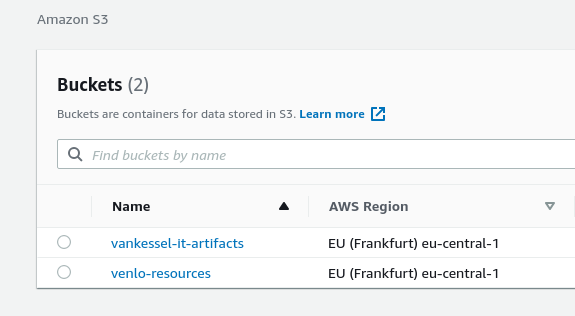
Select wercstat-resources
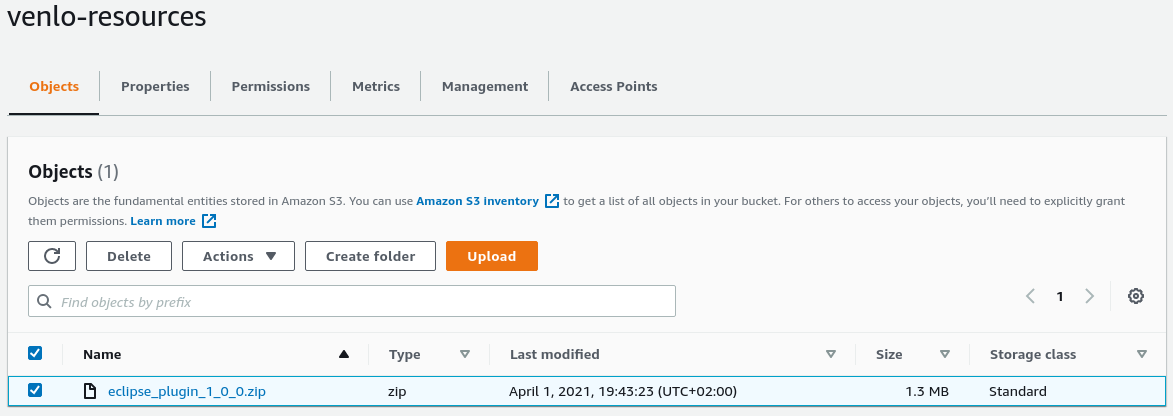
Select eclipse_plugin…..zip and choose download from the actions menu.
Unzip the eclipse_plugin file:
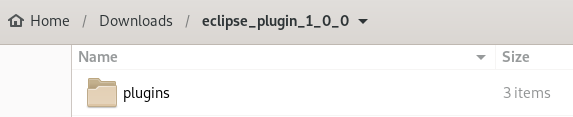
select all files in the plugins directory:
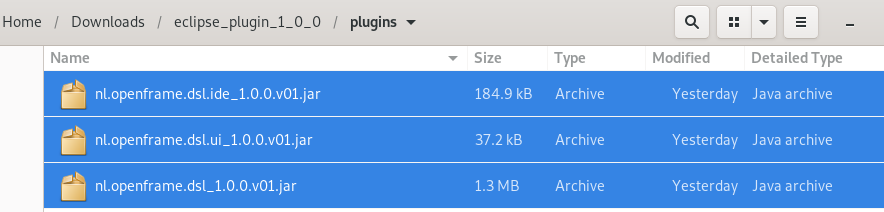
and move them to the eclipse/plugins directory:

Step 4: Start Eclipse
Go to the eclipse directory and start Eclipse by clicking ![]() .
Select the just created
.
Select the just created workspace directory as default:
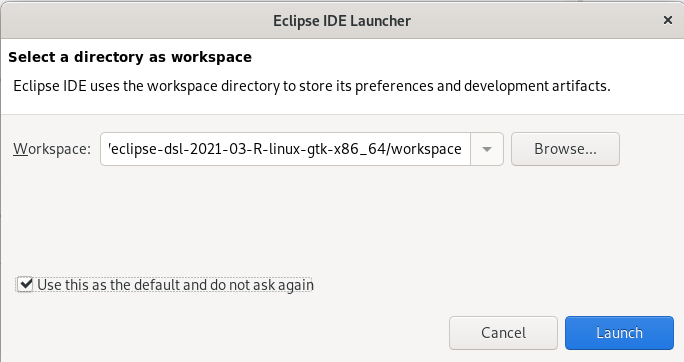
Click launch to start Eclipse.
In the Window / Preferences menu there now is an Real entry for configuration of the plugin.

Create project
The sample project uses Maven to create a standard project-structure and add Wercstat framework dependencies.
Step 1: Start project wizard
In Eclipse select File \ New \ Project to create a new Maven project:
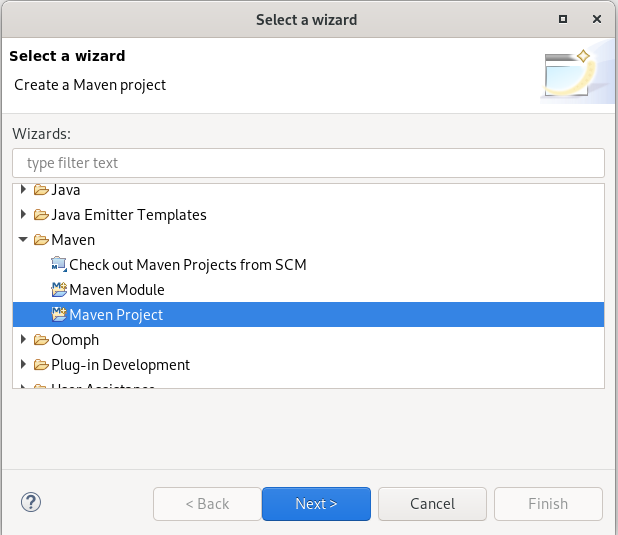
there is no need for an archtype:
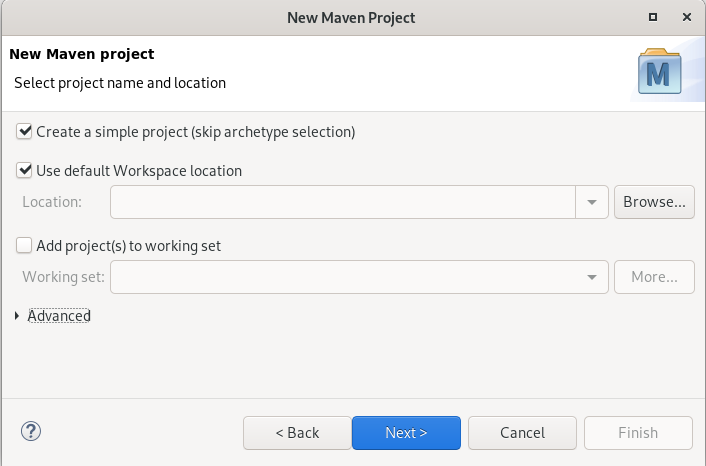
Select Next and complete the maven project model…
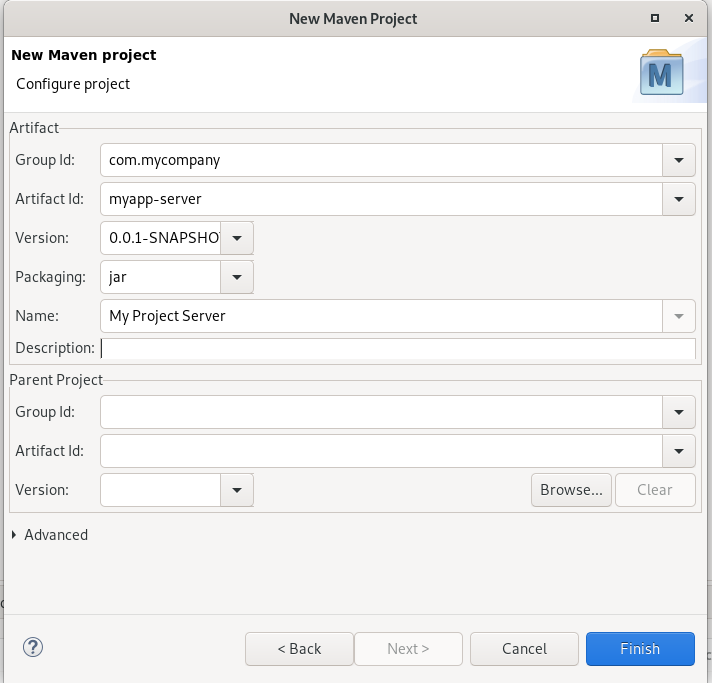
This will create Maven project with the standard directory layout and Maven POM.

Step 2: Add dependencies
Extend the POM to set the character encoding and Java version:
<properties>
	<project.build.sourceEncoding>UTF-8</project.build.sourceEncoding>
	<project.reporting.outputEncoding>UTF-8</project.reporting.outputEncoding>

	<maven.compiler.source>11</maven.compiler.source>
	<maven.compiler.target>11</maven.compiler.target>
</properties>
add a dependency to the Wercstat tooling server library:
<dependencies>
	<dependency>
		<groupId>com.wercstat</groupId>
		<artifactId>frame-server-base</artifactId>
		<version>1.0.42</version>
	</dependency>
</dependencies>
Add the org.codehaus.mojo Maven plugin to include generated code in the build process.
<build>
<sourceDirectory>src/main/java</sourceDirectory>
<plugins>
<plugin>
<groupId>org.codehaus.mojo</groupId>
<artifactId>build-helper-maven-plugin</artifactId>
<executions>
<execution>
<id>add-source</id>
<phase>generate-sources</phase>
<goals>
<goal>add-source</goal>
</goals>
<configuration>
<sources>
<source>src/generated/java/</source>
</sources>
</configuration>
</execution>
</executions>
</plugin>
</plugins>
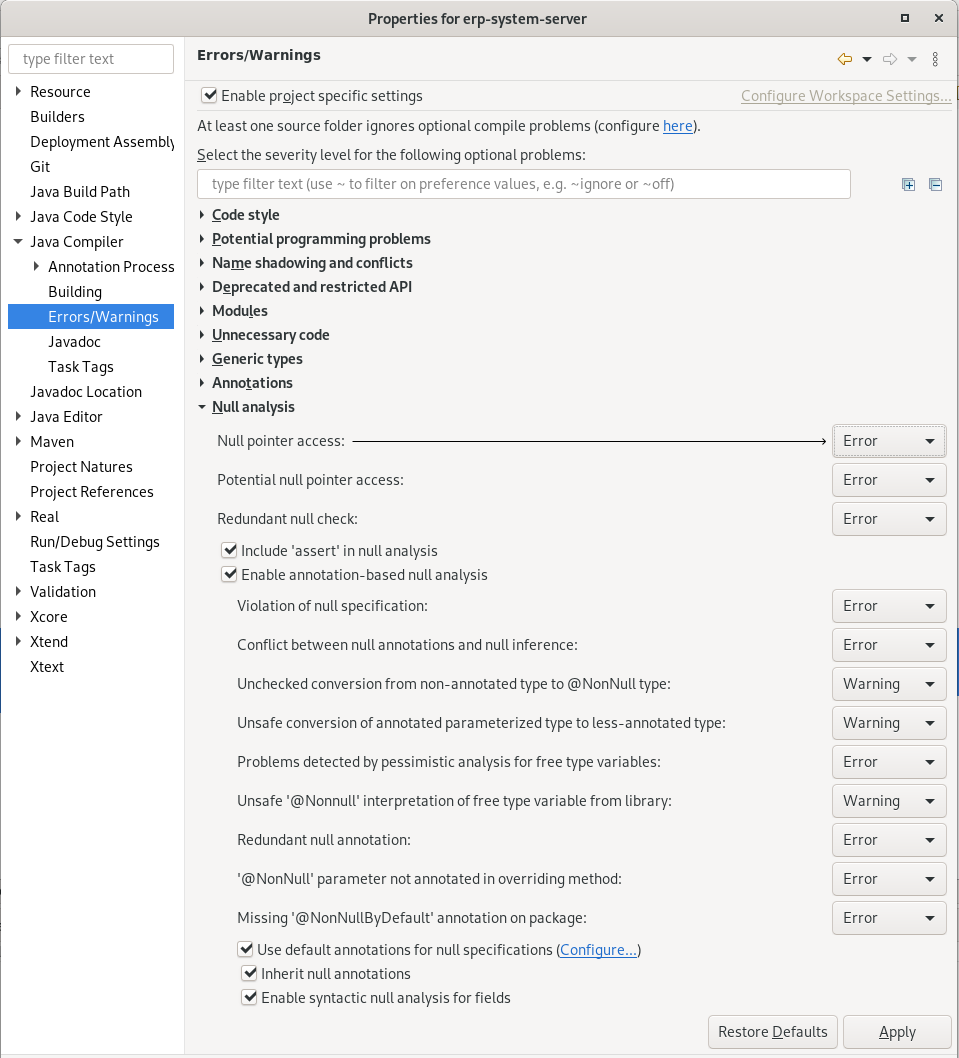
</build>Step 3: Configure Nullability
And finally configure the Nullability settings in the project properties.
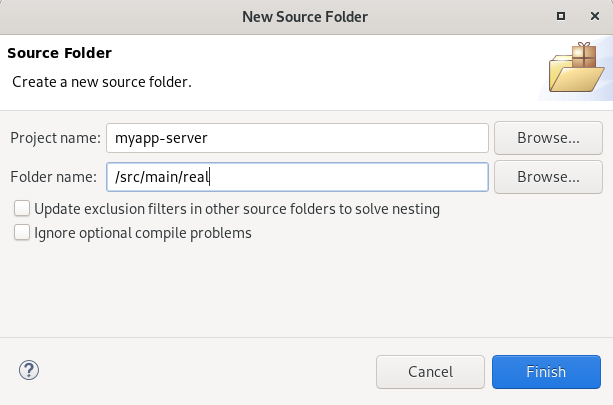
Step 4: Create Wercstat source folder
Wercstat DSL code is stored separate from Java code in a dedicated source directory with name real:
right click on the project and run Maven / Update Project to make sure that
changes in the Maven file are reflected in the Eclipse project configuration. |
Configure testing
Step 1: Add dependencies
Tests are executed within the Spring Container. We have to configure Spring Boot to start up for every test. Declare the Spring testing library dependency.
<dependency>
	<groupId>org.springframework.boot</groupId>
	<artifactId>spring-boot-starter-test</artifactId>
	<scope>test</scope>
	<version>2.4.4</version>
</dependency>
And add a database driver dependency.
<dependency>
<groupId>org.mariadb.jdbc</groupId>
<artifactId>mariadb-java-client</artifactId>
<version>2.4.4</version>
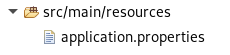
</dependency>Step 2: Add application properties
Spring application properties are stored in the resource folder:
For this example we only need to define the database connection and Hibernate settings.
# Datasource
spring.datasource.driver-class-name=com.mysql.cj.jdbc.Driver
spring.datasource.username=root
spring.datasource.password=<insert_password> (1)
spring.datasource.url=jdbc:mysql://localhost:3306/myapp_db?createDatabaseIfNotExist=true (2)

# Hibernate
spring.jpa.properties.hibernate.dialect = org.hibernate.dialect.MySQL8Dialect
spring.jpa.properties.hibernate.hbm2ddl.auto=update (2)| 1 | use Linux password for default development machine |
| 2 | create database, if not already present |
| 3 | create tables, if not already present |
Step 3: Add Spring configuration
Spring requires a configuration class in folder test/java, main package com.mycompany.myapp.server:
package com.mycompany.myapp.server;

import org.springframework.boot.autoconfigure.EnableAutoConfiguration;
import org.springframework.context.annotation.ComponentScan;
import org.springframework.context.annotation.Configuration;

@Configuration
@ComponentScan(basePackages = {
		"com.wercstat.frame.server",
		"com.mycompany.myapp.server"
})

@EnableAutoConfiguration
public class MyAppServerTestConfiguration {
}
The configuration specifies:
the packages Spring scans for Spring-components. Spring will only manage components in the
com.wercstat.frame.serverandcom.mycompany.myapp.serverpackages.transaction management is enabled. Spring will automatically start and commit transactions, according to the Spring annotations.
Step 4: Add ACL Authorization
All server-side requests are linked to a named user, which is used for logging and error reposting (Bugsnag).
This requires a AclAuthorizationService implementation both for executing the tests and the application.
package com.mycompany.myapp.server.com.par;

@Service
public class MyAppAuthorization implements AclAuthorizationService{

	@Override (1)
	public AclUserDetails getUserDetails(String loginName) {

		return new AclUserDetails(
			loginName,
			"Admin", // Display-name
			"123", // Password
			false, // Archived
			false, // Locked
			Arrays.asList("adminRole") // Roles
			);
	}

	@Override (2)
	public AclObjectType getAclObjectType(
			final String roleCode,
			final String objecType) {

		return new AclObjectType(
			"Administrator Role", // Role-name
			"", // Class-name
			new ArrayList<>() // Acl Entries
			);
	}

	@Override (3)
	public AclAuthorization getAuthorization(
		final String javaClassName,
		final List<String> roleNames) {

		return AclAuthorization.fullAccess();
	}
}| 1 | Retrieve user display name and roles given a login-name |
| 2 | Retrieve ACL-entries for a given role, e.g. retrieving menu-options by role |
| 3 | Retrieve authorizations for an application component given one or more roles |
Sample Project
This sample project creates a small application with Country and Partner entities
in a small module com.par (module common , submodule partner).
The source code is split into a server-side component (package com.mycompany.myapp.server.com.par)
and a client-side component ( com.mycompany.myapp.client.com.par).
Server Side
Label set
Wercstat entities and value types require labels, so the first step is to create a label-set.
Label sets are collections of key/value pairs that enable language independent naming of elements in the user-interface.
They are implemented as Java property files for which we can create language dependent variants.
As this is the first DSL file, first we must create a package in the src/main/real source folder.
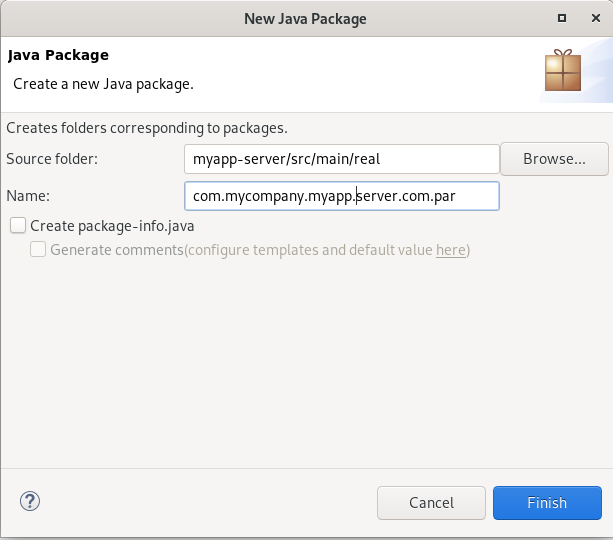
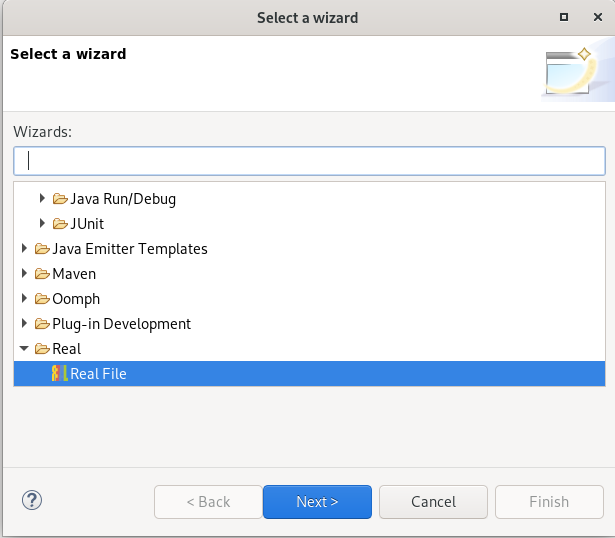
Right click on the new package, select Create File and find the Wercstat file wizard:
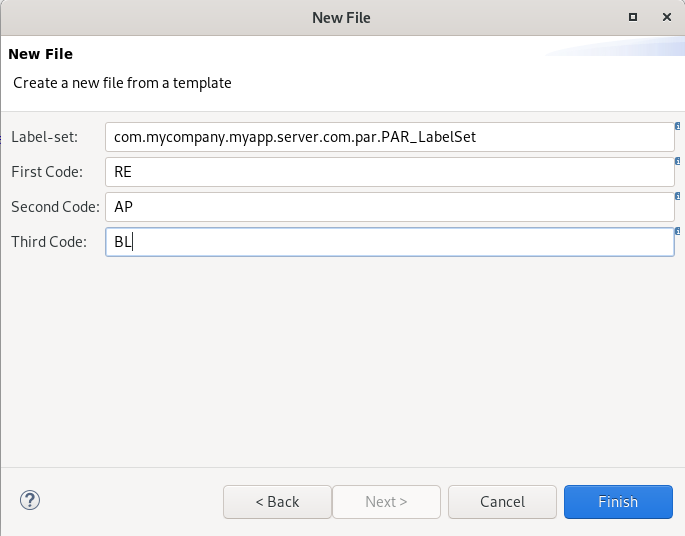
Select Label Set from the template drop-down. This label set will hold labels for the Partner module:
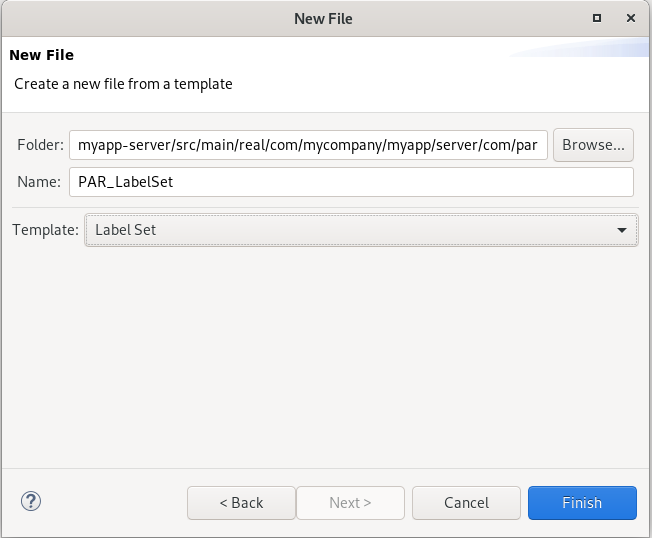
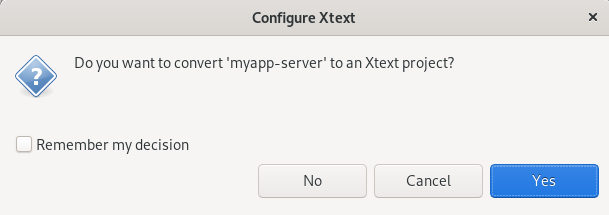
You might be asked to convert the project to XText, select Yes.
| All icons are listed here: https://vaadin.com/components/vaadin-icons/java-examples . Available styles for buttons: https://vaadin.com/components/vaadin-button/html-examples/button-theme-variants-demos . |
Add all labels required by the sample project.
labelSet PAR_Labels{
label nameLabel "Name"
label codeLabel "Code"
label partnerLabel "Partner"
label chamberOfCommerceLabel "Chamber of Commerce"
label partnerStatusLabel "Partner Status"
label partnerStatusLabelRE "Review" icon "QUESTION"
label partnerStatusLabelAP "Approved" icon "CHECK" style "primary"
label partnerStatusLabelBL "Blocked" icon "BAN" style "error"
label countryLabel "Country"
label descriptionLabel "Description"
label telephoneLabel "Telephone"
label streetLabel "Street"
label zipCodeLabel "ZipCode"
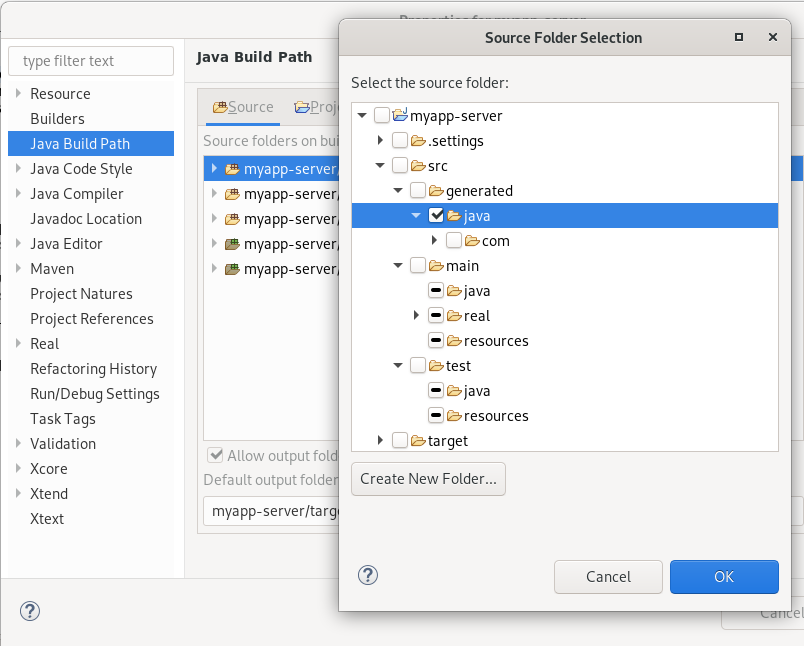
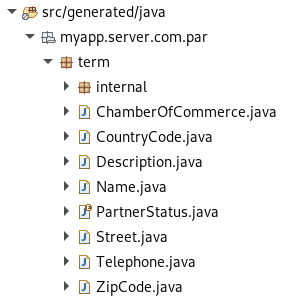
}As this is the first Wercstat DSL element, a new src/generated/java directory is created to hold the generated code.
Add this directory to the Eclipse source-folders in the project-properties Java Build Path section.
Click Add Folder and select the generated / Java directory.
Right-click the folder and selected Derived,
this tells Eclipse that the directory contains derived resources which should not be edited by the user directly.
In the Java Compiler section, select Ignore optional compile problems,
this deactivates all optional Nullable-check errors.
In the Window / Properties / Java / Appearance menu, you can shorten
the package name as shown in the project explorer. Use for example com.mycompany.myapp=myapp. |
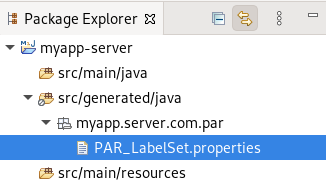
The generated properties file is stored in the generated source folder.
nameLabel=Name
codeLabel=Code
partnerLabel=Partner
chamberOfCommerceLabel=Chamber of Commerce
partnerStatusLabel=Partner Status
partnerStatusLabelRE=Review
partnerStatusLabelRE.icon=QUESTION
partnerStatusLabelAP=Approved
partnerStatusLabelAP.icon=CHECK
partnerStatusLabelAP.style=primary
partnerStatusLabelBL=Blocked
partnerStatusLabelBL.icon=BAN
partnerStatusLabelBL.style=error
countryLabel=Country
descriptionLabel=Description
telephoneLabel=Telephone
streetLabel=Street
zipCodeLabel=ZipCode
Server configuration
Wercstat projects require a server side configuration file to store project settings.
One of those settings is a list of label-sets that must be loaded at startup.
Use the Wercstat file wizard to create a configuration file:
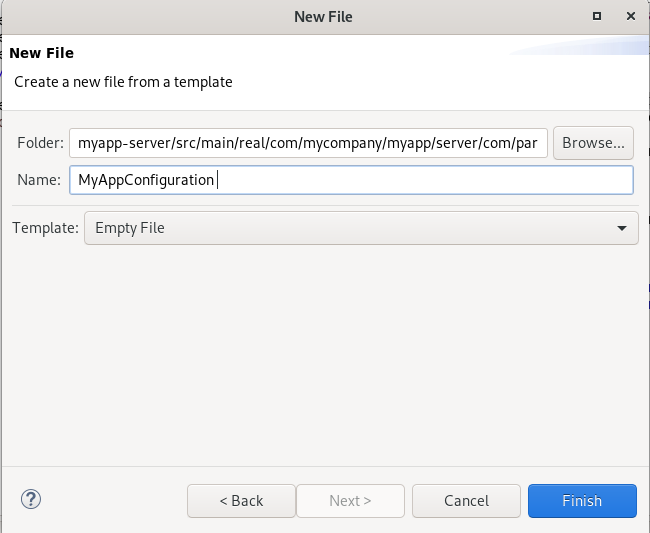
Add the server-configuration:
package com.mycompany.myapp.server.com.par

import com.mycompany.myapp.server.com.par.PAR_Labels

server-configuration MyAppConfiguration {
	label-set PAR_Labels
}
Wercstat generates a Spring @Configuration file in the generated sources folder,
which declares label-sets as a message-resource.
Label-set test
The label-set is declared, and the configuration file will ensure it is loaded into the Spring container.
Create a unit test to check if the labels are available:
package com.mycompany.myapp.server.com.par;

@ContextConfiguration(classes = { MyAppServerTestConfiguration.class }) (1)

@SpringBootTest
public class PAR_LabelsTest {

	@Inject
	LabelProvider labelProvider; (2)

	@Test
	void nameLabelGetTest() {
		DomainLabel label = labelProvider.getLabel("nameLabel");
		assertEquals("Name",label.getDescription());
	}
}| 1 | MyAppServerTestConfiguration was created during project setup |
| 2 | The labelprovider gives access to all the label-sets defined in the server configuration |
Labels are server-side components.
They are only available client-side via the remoting interface.
Value types
Value Types provide an abstraction from primitive types (String, BigDecimal, LocalDate, etc.), and bring the code closer to the business domain.
PartnerCode
Add a term package for value-types in the com.par sub-module. Use the file-wizard to create a string value-type.
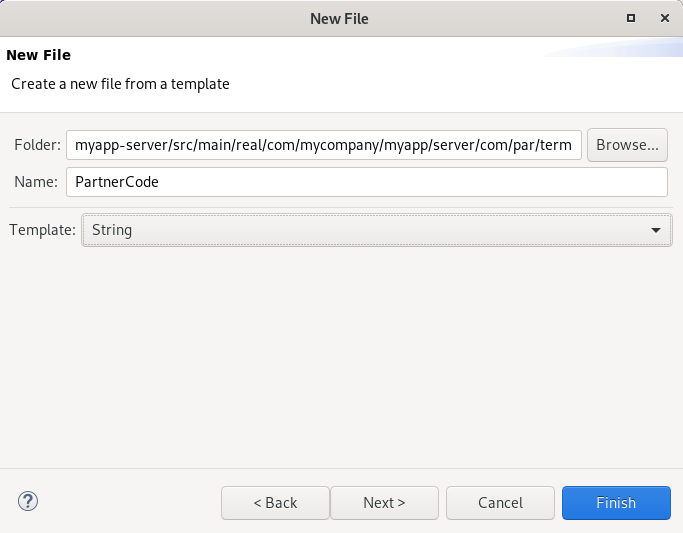
We can specify the label set here, or later modify it in the DSL code.

clicking finish will generate the Wercstat DSL file.
package com.mycompany.myapp.server.com.par.term

import com.mycompany.myapp.server.com.par.PAR_Labels.codeLabel

string PartnerCode codeLabel 30 custom
three new files are generated:
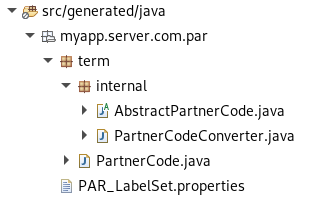
A PartnerCode class is created in the generated/java-folder.
This is an empty subclass intended for custom business logic.
If we do want to add business code, the class has to move to the main/java folder.
This is easily done by adding the custom keyword to the type definition.

Saving the Wercstat file moves the class to the main source code folder where it can be edited.

Removing the custom tag will re-create the class in the generated/java folder.
The class in the main/java folder must me removed manually,
Wercstat will never remove files in main/java.
If the file is not removed, the class will exist in two source folders which will show up as an error in the IDE.
Package com.par.term has an error indicator because the package-info file is missing.
Add the file with a NonNullByDefault annotation:

By adding business code we can define new methods, modify the data on creation or add checks.
For example; the PartnerCode should not contain spaces.
public class PartnerCode extends AbstractPartnerCode{

	public PartnerCode(final String value) {
		super(value);
		if(value.contains(" ")) {
			throw BusinessException.create("No space allowed in Partner code");
		}
	}
}
This code will ensure that an exception is thrown anywhere in the code
where a PartnerCode is instantiated containing spaces.
This includes not only the UI, but also the instantiation of JPA Entities the moment they are loaded from the database.
This means Partner entities with a code containing spaces will throw an exception when read form the database (fail early). |
the corresponding test:
public class PartnerCodeTest {

	@Test
	void partnerCode_spaceNotAllowed_Test() {

		PartnerCode.of("ABC");

		assertThrows(BusinessException.class, ()->PartnerCode.of("A C"));
	}
}
It is important to notice that the constructor parameter is not checked against null.
The IDE will ensure that such errors are caught at development time:
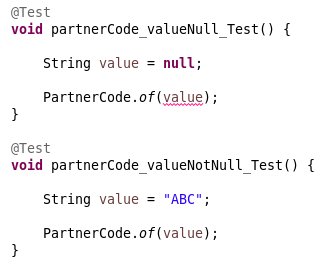
In order to state a clear intention, the recommended declaration is: |
Partner Status
Partner Status is an enumerate.
Right click on the term package to start the File Wizard.
Select Enumerate from the templates:
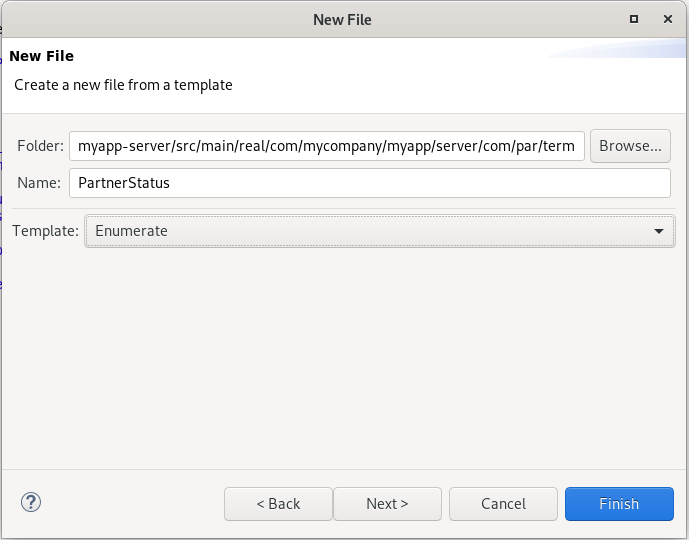
select Next > and add the codes specified in the label-set.
the following code is generated from the template:
package com.mycompany.myapp.server.com.par.term

import com.mycompany.myapp.server.com.par.PAR_Labels.partnerStatusLabel
import com.mycompany.myapp.server.com.par.PAR_Labels.partnerStatusLabelRE
import com.mycompany.myapp.server.com.par.PAR_Labels.partnerStatusLabelAP
import com.mycompany.myapp.server.com.par.PAR_Labels.partnerStatusLabelBL

enumerate PartnerStatus partnerStatusLabel
{
	 RE : partnerStatusLabelRE
	 AP : partnerStatusLabelAP
	 BL : partnerStatusLabelBL
}
You can also import all labels using a wildcard. |
The generated Java class has two additional methods:
getPersistenceCode: returns the string used to store the enumerate in the database.getLabelCode(): returns the label-code key to access the properties-map.
@Test
void partnerStatus_persistentCode_Test() {

	String persistentCode = PartnerStatus.APPROVED.getPersistenceCode();

	assertEquals("AP",  persistentCode);
}

@Test
void partnerStatus_labelCode_Test() {

	String labelCode = PartnerStatus.APPROVED.getLabelCode();

	assertEquals("partnerStatusLabelAP",  labelCode);
}
Java Enumerates do not support inheritance,
so no abstract superclass is created in the internal directory.
Adding the custom keyword will move the complete implementation to the main/java folder.
Other types
Create one empty Wercstat DSL source file using the wizard, and add all remaining types:
package com.mycompany.myapp.server.com.par.term

import com.mycompany.myapp.server.com.par.PAR_Labels.*

string Name nameLabel 50
string ChamberOfCommerce chamberOfCommerceLabel 40
string CountryCode codeLabel 3
string Description descriptionLabel 60
string Telephone telephoneLabel 13
string Street streetLabel 50
string ZipCode zipCodeLabel 10
The Wercstat DSL supports auto-completion by typing CTRL-SPACE. |
The generated files will appear after the next build.
Entities
Wercstat uses standard JPA entities for persistence, using inheritance to separate framework- and business-code.
Country
Right click on the com.par package inside the real source folder and start the Entity file wizard.
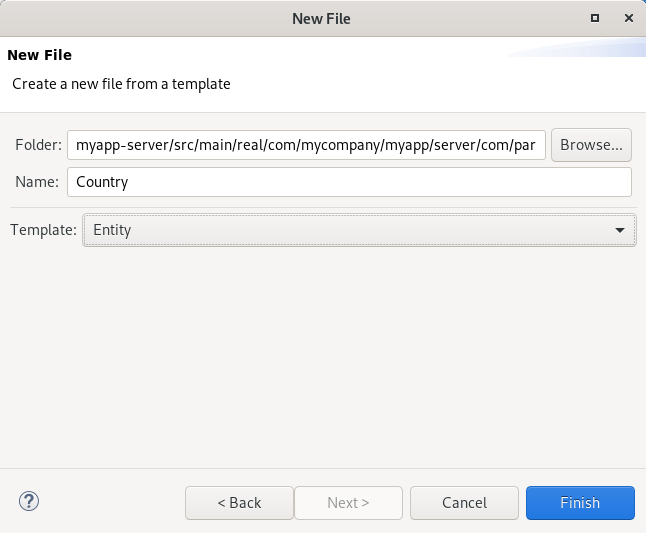
selecting Finish will create the empty Country DSL.
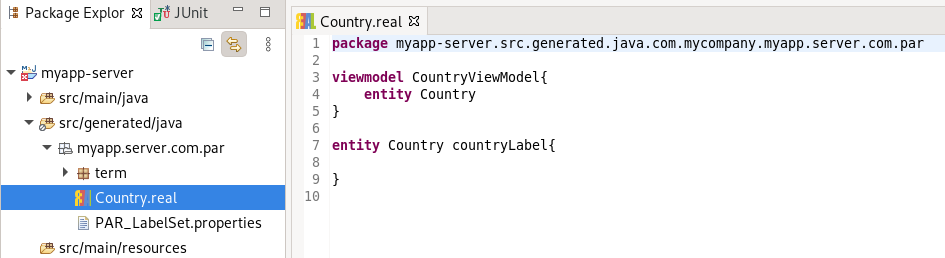
Note there is a CountryViewModel declaration.
View models provide a level of indirection between the Entity and UI.
For now this simple view-model implementation is sufficient.
Add the following lines to import all labels and value types.
import com.mycompany.myapp.server.com.par.term.*
import com.mycompany.myapp.server.com.par.PAR_Labels.*
Add the fields to the Country entity:
entity Country countryLabel{

	business-key code (1)
	search-paths description (2)

	attribute CountryCode code
	attribute Description description
}
All fields are mandatory by default. Add the optional keyword to allow for empty or Null values.
Note the extra definitions:
| 1 | business-key: the unique identifier of a record, in this case the language code. |
| 2 | search-paths: domain paths which can be used for searching an entity in the UI.
In this case the user, by default, can search for countries by any string contained in the description. |
Building the project will generate the AbstractCountry and Country Java classes.
Again, the empty Country sub-class can be moved to the main/java folder by adding the custom keyword.
@Entity (1)
@Access(AccessType.FIELD)
@Table(name="com_par_country", (2)
	uniqueConstraints=@UniqueConstraint(columnNames={"code"})) (3)

public class Country extends AbstractCountry{

	// Protected constructor required by Hibernate
	protected Country(){
		super();
	}

	public Country(
		final CountryCode code,
		final Description description){ (4)

		super(
			code,
			description
		);
	}
}| 1 | Entity is mapped to a database table and managed by JPA |
| 2 | Specify the table name, note it contains the module prefix com_par |
| 3 | Uniqueness constraint on the business-key to prevent duplicate country-codes |
| 4 | Both code and description are mandatory and therefore included in the constructor.
This ensures that all mandatory fields are always set for Country instances. |
The concrete class only contains non-inheritable JPA annotations. I.e. it is not possible to move these to the abstract super-class.
Changing the business-key in the |
Partner
Right click on the com.par package inside the real source folder and start the Entity file wizard.

selecting finish will create the empty Partner DSL template.

Apart from labels and value types we must also import the Country entity.
import com.mycompany.myapp.server.com.par.Country
import com.mycompany.myapp.server.com.par.term.*
import com.mycompany.myapp.server.com.par.PAR_Labels.*
Add the business key and fields.
entity Partner partnerLabel{

	business-key code
	search-paths name

	attribute PartnerCode code
	attribute Name name
	attribute ChamberOfCommerce chamberOfCommerce optional
	attribute PartnerStatus partnerStatus

	relation Country country
}
Building the project will generate the Partner.java and PartnerRepository.java files.
Entities test
package com.mycompany.myapp.server.com.par;

@ContextConfiguration(classes = { MyAppServerTestConfiguration.class })
@Transactional (1)

@SpringBootTest
public class CountryTest{

	@Inject CountryRepository countryRepository;

	@Test
	void saveFindCountryTest() {

		assertEquals(0, countryRepository.count()); (2)

		Country countrySave = new Country(
				CountryCode.of("NL"),
				Description.of("Netherlands"));

		countryRepository.save(countrySave);
		assertEquals(1, countryRepository.count());(3)

		@Nullable Country countryDE = countryRepository.findByCode(CountryCode.of("DE"));
		assertEquals(null, countryDE); (4)

		@Nullable Country countryNL = countryRepository.findByCode(CountryCode.of("NL"));
		assertEquals(countrySave, countryNL); (5)
	}
}| 1 | Ensures that the database transaction is rolled back |
| 2 | Country table is empty before saving the country |
| 3 | Country table has one record after saving the country |
| 4 | Find with wrong country-code returns no value |
| 5 | Find with correct country-code returns the previously saved country |
Running the test will start the Spring Application server.
The Partner and Country classes are located in the base-packages (see [MyAppServerTestConfiguration])
and recognized as JPA (Java Persistence API, see https://en.wikipedia.org/wiki/Jakarta_Persistence) entities. JPA in turn will create the database and tables.
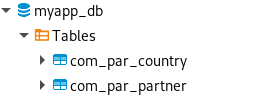
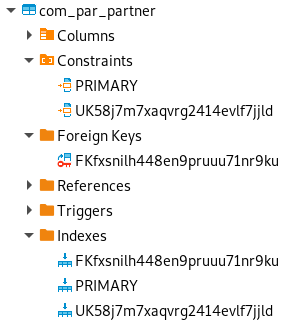
The country table has the following columns:
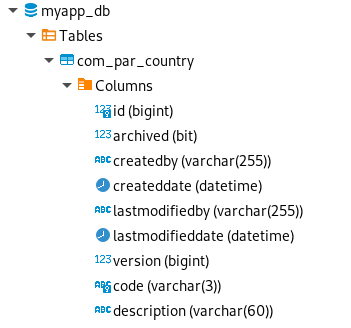
The entity has only two business fields; code and description.
Seven additional system fields are added automatically:
idthe primary key, this is a surrogate key, i.e. it has no business meaning
archiveda boolean value to mark records as
archivedin a uniform waycreatedbyname of user that created the record
createddatedate/time the record was created
lastmodifiedbyname of user that modified the record last
lastmodifieddatedate/time the record was modified last
versionversion number internally used for optimistic locking
And finally two constraints and two indexes are added.
Both for the primary key (id field) and the business key (code field).
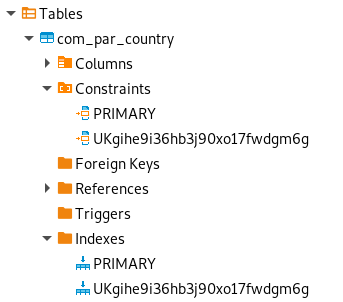
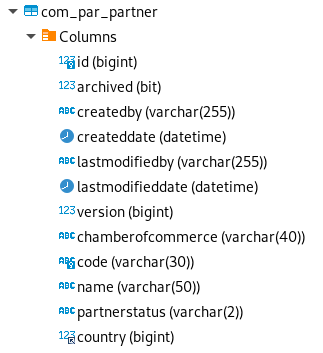
The Partner table has similar extra fields and constraints.
Note that the country field is a reference to the id field of the Country table.
This table reference creates an additional index (for performance reasons) and foreign-key constraint in the Partner table.
Client Side
Pages
To add a user interface we have to add a Maven dependency to the Wercstat vaadin client.
<dependency>
	<groupId>com.wercstat</groupId>
	<artifactId>frame-client-vaadin</artifactId>
	<version>1.0.28</version>
</dependency>| For larger code-bases, server and client modules would be separated into multiple Eclipse projects. |
Create a new Partner Page using the file wizard.
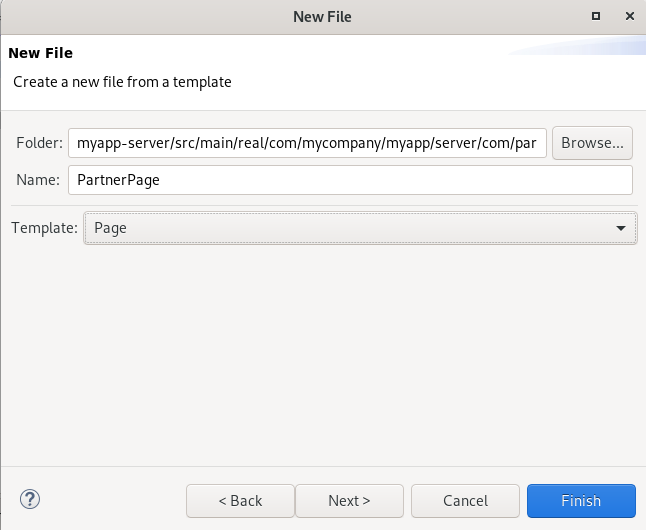
select Next and enter the entity name.

this will generate a basic page template:
package com.mycompany.myapp.server.com.par

grid PartnerGrid
{
	viewmodel PartnerViewModel
}

form PartnerForm
{
	viewmodel PartnerViewModel
}

page PartnerPage partnerPageLabel
{
	viewmodel PartnerViewModel partnerViewModel

	view PartnerGrid partnerGrid partnerViewModel
	view PartnerForm partnerForm partnerViewModel defaultToolbar

	segment pane1 partnerPageLabel
	{
		display partnerGrid
		input partnerForm
	}
}
The template does not include imports, we have to add these manually:
import com.mycompany.myapp.server.com.par.PartnerViewModel
import com.mycompany.myapp.server.com.par.PAR_Labels.*
next we add fields for both the grid and form.
grid PartnerGrid
{
	viewmodel PartnerViewModel

	field code
	field name
	field chamberOfCommerce
	field country/description (1)
}| 1 | Display the description of the country. You can select any field that is directly or indirectly reachable from the view model entity. |
use CTRL-SPACE for auto-completion |
form PartnerForm
{
	viewmodel PartnerViewModel

	field code
	field name
	field chamberOfCommerce
	field country [description] (1)
}| 1 | This form line will show two fields: first the business-key of the selected country
and second the description field of the country. |
Now the grid and form are complete, the .real file has no errors, and the Java files are generated.
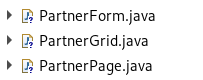
We will have a look and the generated code in more detail later.
Code generation for the User Interface is intended to be simple, flexible and optional.
You can create Forms, Grids and Pages without code generation or even with partial code generation.
The PartnerPage has a partnerPage URL, now we have to add the configuration to start the application and display the page.
Add MyAppClientConfiguration
package com.mycompany.myapp.server.com.par;

@Configuration
@ComponentScan(basePackages = {
		"com.wercstat.frame.client.vaadin",
		"com.wercstat.frame.client",
		"com.wercstat.frame.server",

		"com.mycompany.myapp.client",
		"com.mycompany.myapp.server"
})

@EnableJpaRepositories(basePackages = "com.mycompany.myapp.server")
@EnableJpaAuditing
@EnableTransactionManagement
public class MyAppClientConfiguration {
}
Add MyAppClientApplication
package com.mycompany.myapp.server.com.par;

@SpringBootApplication
public class MyAppClientApplication extends SpringBootServletInitializer {

    public static void main(final String[] args) {
        SpringApplication.run(MyAppClientApplication.class, args);
    }
}
and run MyAppClientApplication as a Java application.
Appendix
Linux Server Setup
Linux Server Remote Access
SSH into remote server
ssh username@srv-real-lindev

The authenticity of host 'srv-real-lindev (192.168.x.x)' can't be established.
ECDSA key fingerprint is SHA256:xxxxxxxxxxxxxxxxxxxxxxxxxxxxxxxxxxxxxx.
Are you sure you want to continue connecting (yes/no/[fingerprint])?
Confirm fingerprint with yes:
Warning: Permanently added 'srv-real-lindev,192.168.x.x' (ECDSA) to the list of known hosts.Linux Server Setup
Installation new PC based on fresh Linux Mint / Mate.
sudo apt updateInstall git
sudo apt install git
git --version
For details see: https://www.git-scm.com/book/en/v2/Customizing-Git-Git-Configuration
Install NPM (Vaadin requirement)
sudo apt install npmInstall Maven
sudo apt install maven
mvn -version
do not change the settings.xml in the maven installation directory.
Only modify settings.xml in the .m2 directory of the user home directory.
Create the file if it does not yet exist. |
Install Curl
sudo apt install curlInstall AWS CLI
cd ~/Downloads
curl "https://awscli.amazonaws.com/awscli-exe-linux-x86_64.zip" -o "awscliv2.zip"
unzip awscliv2.zip
sudo ./aws/install
/usr/local/bin/aws --version
Check in new terminal:
aws --versionSee for detailed setup instructions: |
Install graalvm
tar -xzf graalvm-ce-java17-linux-amd64-22.0.0.2.tar.gz

sudo mv ./graalvm-ce-java17-22.0.0.2 /usr/lib/jvm
cd /usr/lib/jvm
sudo ln -s graalvm-ce-java11-21.1.0 graalvm
sudo update-alternatives --install /usr/bin/java java /usr/lib/jvm/graalvm/bin/java 1
Select graalvm as default
sudo update-alternatives --config javaCheck:
java --versionInstall MySql
sudo apt install mysql-server
mysql --version
sudo mysql_secure_installation
validate password: Y
level: 0
password: …..
remove anonymous users: yes
disallow remote login: no
remove test database: yes
reload privilege tables now: yes
use |
sudo snap install mysql-workbench-communityInstall Remmina
Remmina is a remote desktop client to access VNC or RDP servers.
sudo apt-add-repository ppa:remmina-ppa-team/remmina-next
sudo apt update
sudo apt install remmina remmina-plugin-rdp remmina-plugin-secretInstall Graphviz
Graphviz is a diagram utility used for documentation (see https://www.graphviz.org/ )
sudo apt install graphvizInstall DBBeaver (optional)
wget -O - https://dbeaver.io/debs/dbeaver.gpg.key | sudo apt-key add -
echo "deb https://dbeaver.io/debs/dbeaver-ce /" | sudo tee /etc/apt/sources.list.d/dbeaver.list
sudo apt-get update && sudo apt-get install dbeaver-ceStart DBeaver and import the project exported from the previous installation
Remote Access via VPN (optional)
https://docs.paloaltonetworks.com/globalprotect/5-1/globalprotect-app-user-guide/globalprotect-app-for-linux/download-and-install-the-globalprotect-app-for-linux.html
hostname/IP server:
ecp1realdev / 192.168.28.53Copy file: PanGPLinux-5.1.1-c17.tgz
tar -xvf ./PanGPLinux-5.1.1-c17/
sudo apt-get install ./GlobalProtect_UI_deb-5.1.1.0-17.debCheck AWS Maven Artifacts (optional)
Linux User Setup
Login
login via RDP using Remmina
skip through the setup with
next
in the
Activities/Applicationsmenu choose all with the…...in the search dialog type
tweaks, and select the iconin Tweaks select the
extensionsmenu, and activateUbuntu Dock
Configure git
git config --global user.email "xxxx@gmail.com" git config --global user.name "xxxxxxx"
Configure maven
Execute a maven clean just to create the .m2 directory:
mvn clean
go to the maven directory:
cd ~/.m2
Add Maven settings.xml file in directory .m2
vi settings.xml
with the following content:
<settings>
<servers>
<server>
<id>vankessel-it--venlo-artifact-repository</id>
<username>aws</username>
<password>${env.CODEARTIFACT_AUTH_TOKEN}</password>
</server>
</servers>
<profiles>
<profile>
<id>vankessel-it--venlo-artifact-repository</id>
<activation>
<activeByDefault>true</activeByDefault>
</activation>
<repositories>
<repository>
<id>vankessel-it--venlo-artifact-repository</id>
<url>https://vankessel-it-514884335141.d.codeartifact.eu-central-1.amazonaws.com/maven/venlo-artifact-repository/</url>
</repository>
</repositories>
</profile>
</profiles>
</settings>During copy from PDF the |
Configure AWS CLI
Add AWS Artifactory authorization update to ~/.profile
vi ~/.profile
add the following line:
export CODEARTIFACT_AUTH_TOKEN=`aws codeartifact get-authorization-token --domain vankessel-it --domain-owner 514884335141 --query authorizationToken --output text`
Configure AWS. The keys are provided by the AWS manager (as .csv. file) and must stay confidential.
aws configure
Key ID : <as provided in .csv file>
Access Key : <as provided in .csv file>
Default Region Name : eu-central-1
Default Output Format: json
Configure CodeCommit
Create an encryption key
ssh-keygen Generating public/private rsa key pair. Enter file in which to save the key (/home/xxxxxxxx@xxxxxx.xxx/.ssh/id_rsa): (1) Enter passphrase (empty for no passphrase): (2) Enter same passphrase again: (2)
| 1 | use default setting; type enter |
| 2 | use a private password, it is required on the first commit to .git. |
Result:
Your identification has been saved in codecommit_rsa Your public key has been saved in id_rsa.pub The key fingerprint is: ................
Display the public key on the console:
cat ~/.ssh/id_rsa.pub
Send a copy of the key to the AWS administrator.
The administrator will return a SSH Key ID, e.g. APKAXPYL7<EXAMPLE>OYS67ZFUFMC.
This public key has to be added to the config file in your local .ssh directory.
cd ~/.ssh vi config
Add the following content:
Host git-codecommit.*.amazonaws.com User APKAXPYL7<EXAMPLE>OYS67ZFUFMC IdentityFile ~/.ssh/id_rsa
Check the configuration:
ssh git-codecommit.eu-central-1.amazonaws.com
the result should resemble:
You have successfully authenticated over SSH. You can use Git to interact with AWS CodeCommit. Interactive shells are not supported.Connection to git-codecommit.eu-central-1.amazonaws.com closed by remote host. Connection to git-codecommit.eu-central-1.amazonaws.com closed.
See for more details: https://docs.aws.amazon.com/codecommit/latest/userguide/setting-up-ssh-unixes.html |
Configure Remmina
Load connections (exported from previous installation)
Windows System Setup
Installation new PC based on fresh Windows
Download GIT
Install GIT
Download Maven
Install Maven
sudo apt install maven
mvn -versionExecute a maven clean just to create the .m2 directory:
mvn cleanAdd Maven settings.xml file in .m2
<settings>
<servers>
<server>
<id>vankessel-it--venlo-artifact-repository</id>
<username>aws</username>
<password>${env.CODEARTIFACT_AUTH_TOKEN}</password>
</server>
</servers>
<profiles>
<profile>
<id>vankessel-it--venlo-artifact-repository</id>
<activation>
<activeByDefault>true</activeByDefault>
</activation>
<repositories>
<repository>
<id>vankessel-it--venlo-artifact-repository</id>
<url>https://vankessel-it-514884335141.d.codeartifact.eu-central-1.amazonaws.com/maven/venlo-artifact-repository/</url>
</repository>
</repositories>
</profile>
</profiles>
</settings>do not change the settings.xml in the maven installation directory.
Only modify settings.xml in the .m2 directory of the user home directory.
Create the file if it does not yet exist. |
curl "https://awscli.amazonaws.com/awscli-exe-linux-x86_64.zip" -o "awscliv2.zip"
unzip awscliv2.zip
sudo ./aws/installAdd AWS Artifactory authorization update to .profile
export CODEARTIFACT_AUTH_TOKEN=`aws codeartifact get-authorization-token --domain vankessel-it --domain-owner 514884335141 --query authorizationToken --output text`Configure AWS
aws configureKey ID : <as provided in .csv file>
Access Key : <as provided in .csv file>
Default Region Name : eu-central-1
Default Output Format: json
Check in new terminal:
aws --versiontar -xzf graalvm-ce-java11-linux-amd64-21.1.0.tar.gz
sudo mv graalvm-ce-java11-21.1.0 /usr/lib/jvm
cd /usr/lib/jvm
sudo ln -s graalvm-ce-java11-21.1.0 graalvm
sudo update-alternatives --install /usr/bin/java java /usr/lib/jvm/graalvm/bin/java 1Select graalvm al default
sudo update-alternatives --config javaCheck:
java --versionSet GraalVM to Eclipse Installed JRE and make it default
Set Projects to use workspace default JRE
sudo apt install mysql-server
mysql --version
sudo mysql_secure_installationvalidate password: Y
level: 0
password: …..
remove anonymous users: yes
disallow remote login: no
remove test database: yes
reload privilege tables now: yes
Setup root (otherwise error Access denied for user 'root'@'localhost')
sudo mysql
ALTER USER 'root'@'localhost' IDENTIFIED WITH mysql_native_password BY '.....'; (1)
exit| 1 | Use linux password |
wget -O - https://dbeaver.io/debs/dbeaver.gpg.key | sudo apt-key add -
echo "deb https://dbeaver.io/debs/dbeaver-ce /" | sudo tee /etc/apt/sources.list.d/dbeaver.list
sudo apt-get update && sudo apt-get install dbeaver-ceStart DBeaver and import the project exported from the previous installation
https://docs.paloaltonetworks.com/globalprotect/5-1/globalprotect-app-user-guide/globalprotect-app-for-linux/download-and-install-the-globalprotect-app-for-linux.html
hostname/IP server:
ecp1realdev / 192.168.28.53Copy file: PanGPLinux-5.1.1-c17.tgz
tar -xvf ./PanGPLinux-5.1.1-c17/
sudo apt-get install ./GlobalProtect_UI_deb-5.1.1.0-17.debRemmina is a remote desktop client to access VNC or RDP servers.
sudo apt-add-repository ppa:remmina-ppa-team/remmina-next
sudo apt update
sudo apt install remmina remmina-plugin-rdp remmina-plugin-secretRemina: Load connections (exported from previous installation)
Graphviz is a diagram utility used for documentation (see https://www.graphviz.org/ )
sudo apt install graphviz