Domain Design
This document is part of the wercstat low-code framework (https://www.wercstat.com).
The following documents are available:
(2) Wercstat Getting Started: installation instructions and hello-world tutorial
(3) Wercstat Value Types: description of Java domain value types
(4) Wercstat Server DSL: description of the server-side Domain Specific Language
(5) Wercstat Client DSL: description of the client-side Domain Specific Language
Overview
Components
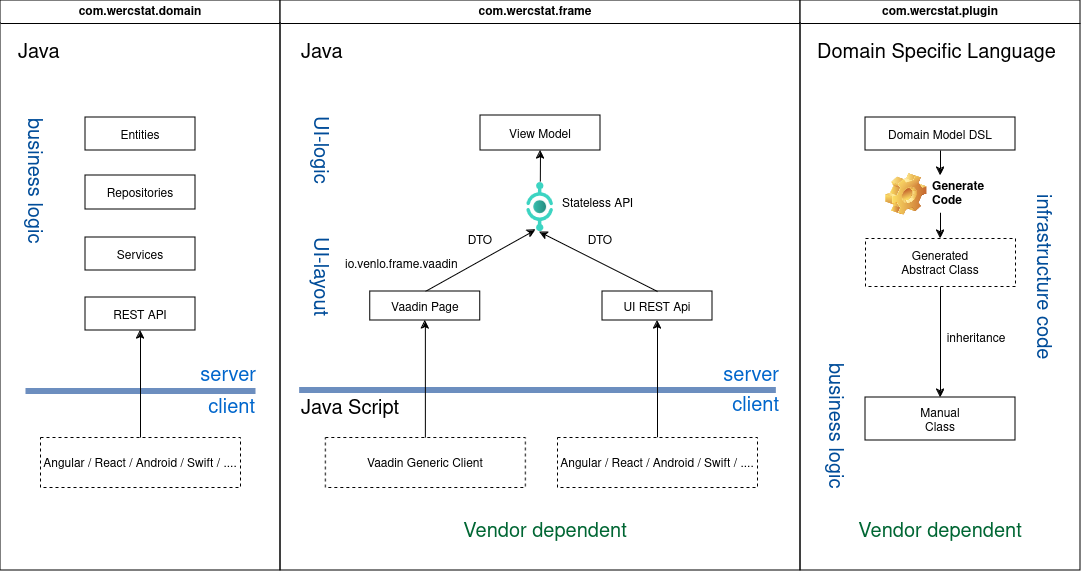
Wercstat consists of three distinct parts:
com.wercstat.domain: the library containing value-types and entity base classes.com.wercstat.frame: the library containing UI components and client-server communication.com.wercstat.plugin: theEclipseplugin provides the domain-model editor and code-generator.
Notes:
Business code depends on
com.wercstat.domainas it provides support for entities and value-types. To prevent vendor lock-in this library is provided as open-source with a permissive license.com.wercstat.frameservers are stateless. The only server-side state is maintained byVaadinPages. This makes the application scalable and a good fit for client-side UIs that communicate viaREST.com.wercstat.plugingenerated code is split into abstract classes with all the logic, and empty concrete sub-classes. Both are by default stored in thesrc/generatedcode folder. By adding thecustomkeyword to theDSLcomponent, the empty concrete class is moved from thesrc/generatedfolder tosrc/main/java, where the developer can add business logic. This ensures there is a clean separation between manual code and generated code.
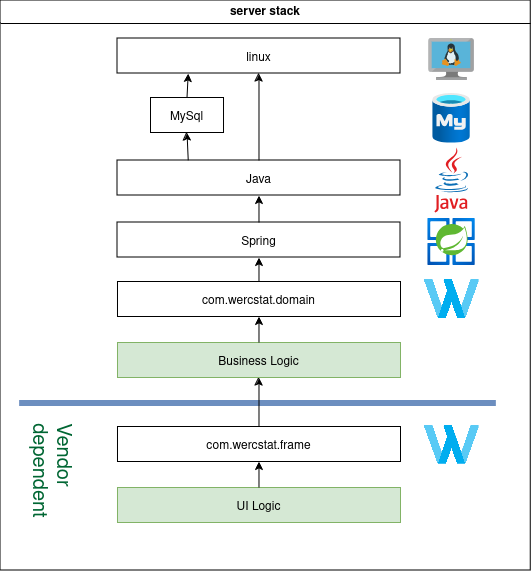
Server Stack
Most of the server stack consists of open-source software,
including the wercstat.io.domain library for value-type and entity support.
User interaction logic depends on the wercstat.io.frame libraries,
which are vendor dependent.
Technologies
Wercstat is compatible with all major databases, operating systems and cloud providers.

Entity to Page
A typical core-business application consists of hundreds of persistent entities (i.e. database tables).
This example illustrates the code required for a new Terms of Delivery entity, from persistence to
a web maintenance page (Create, Update, Delete).
Server side
First step is to create a TermsOfDelivery.real source file for the labels, entity and view-model declaration.
DSL files have a .real extensions, which allows Eclipse to recognize the language and
provide keyword coloring and auto-completion.
Add labels
Labels are declared with the label-set keyword, and can be translated using
standard Java internationalization (i18n) functionality.
label-set TermsOfDeliveryLabels{
	label codeLabel "Code"
	label descriptionLabel "Description" (1)
	label exWorksLabel "Ex Works"

	label transportModeLabel "Transport Mode"
	label transportModeLabelA "Air" icon ICON_AIR (2)
	label transportModeLabelI "Rail" icon ICON_RAIL
	label transportModeLabelR "Road" icon ICON_ROAD
	label transportModeLabelS "Sea" icon ICON_SEA

	label termsOfDeliveryLocationLabel "TOD Location"
	label termsOfDeliveryLocationLabelPLDY "Place of delivery" (2)
	label termsOfDeliveryLocationLabelPLDN "Place of destination"
	label termsOfDeliveryLocationLabelPOST "Port of shipment"
	label termsOfDeliveryLocationLabelPODN "Port of destination"
}| 1 | field labels |
| 2 | enumerate labels |
Add value types
For programming business logic Wercstat does not use primitive type (string, boolean, decimal, etc.)
but domain specific value-types.
string TermsOfDeliveryCode codeLabel 3
string Description descriptionLabel 30
boolean ExWorks exWorksLabel

enumerate TransportMode transportModeLabel
{
	A: transportModeLabelA (1)
	I: transportModeLabelI
	R: transportModeLabelR
	S: transportModeLabelS
}

enumerate TermsOfDeliveryLocation termsOfDeliveryLocationLabel
{
	PLDY: termsOfDeliveryLocationLabelPLDY (2)
	PLDN: termsOfDeliveryLocationLabelPLDN
	POST: termsOfDeliveryLocationLabelPOST
	PODN: termsOfDeliveryLocationLabelPODN
}| 1 | "A" is the code in the database, and transportModeLabelA ("Air") the label displayed in the form and grid. |
| 2 | "PLDY" is the code in the database, and termsOfDeliveryLocationLabelPLDY ("Place of delivery") the label displayed in the form and grid. |
Add entity
In this example the entity represents the table in the database,
and defines all the attributes that constitute a terms-of-delivery.
entity master TermsOfDelivery termsOfDeliveryLabel
{
	business-key code (1)
	search-paths description (2)

	user-fields { (3)
		attribute TermsOfDeliveryCode code
		attribute Description description
		attribute TransportMode transportMode optional
		attribute TermsOfDeliveryLocation termsOfDeliveryLocation
		attribute ExWorks exWorks default false
	}
}| 1 | terms-of-delivery codes are unique |
| 2 | when the user enters a search-term to select a record, both the code and description are searched |
| 3 | all fields are maintained by the user |
The database table corresponding with the entity can be created automatically,
using the standard Java persistence API (JPA).
JPASystem fields are automatically added to register creation date-time, modify date-time, version and data-area (for multi-tenancy).
Add view-model
The view-model defines all the fields and actions that are available in the user-interface.
For terms-of-delivery it consists only of entity-fields,
no extra form-fields or actions are required.
view-model, using the previously declared entity:package com.wercstat.erp.client.com.log
viewmodel TermsOfDeliveryViewModel{
entity TermsOfDelivery
}Client side project
For a clean server / client separation, create a new TermsOfDeliveryPage.real DSL file for the form, grid and page.
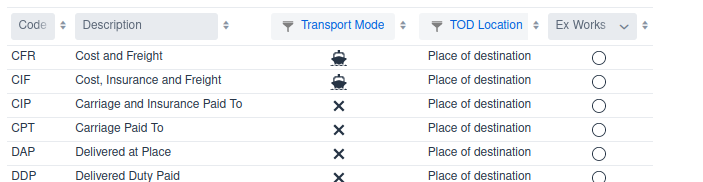
Add grid
The grid displays a list of terms-of-delivery records on the web-page.
It has search and sorting functionality by default.
view-model:grid TermsOfDeliveryGrid
{
viewmodel TermsOfDeliveryViewModel
field code
field description
field transportMode
field termsOfDeliveryLocation
field exWorks
}Add form
The form provides fields for modifying terms-of-delivery attributes.

view-model:form TermsOfDeliveryForm
{
viewmodel TermsOfDeliveryViewModel
field code
field description
next-column
field transportMode
field termsOfDeliveryLocation
field exWorks
}Add page
The page combines grids and forms, and links them together with one or more view-models.
view-model, grid and form:page TermsOfDeliveryPage termsOfDeliveryLabel{
viewmodel TermsOfDeliveryViewModel todViewModel (1)
view TermsOfDeliveryGrid termsOfDeliveryGrid todViewModel (2)
view TermsOfDeliveryForm termsOfDeliveryForm todViewModel defaultToolbar (3)
vertical { (4)
add termsOfDeliveryGrid expand
add termsOfDeliveryForm
}
}| 1 | declare view-model |
| 2 | link view-model to the grid |
| 3 | link view-model to the form and add a default toolbar with Remove, New and Save buttons. |
| 4 | declare the layout of grid and form |
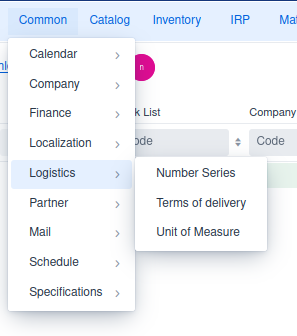
Add menu
The menu DSL keyword provides a convenient way to group pages into
hierarchical menu’s that can be displayed anywhere in the user interface.
Find the menu for the module (in this case com.log), and add the page to the menu.
menu Menu_com_log com_log_Label (1)
{
	page NumberSeriesPage
	page TermsOfDeliverPage (2)
}| 1 | the menu is called com_log according to the module structure. |
| 2 | new terms-of-delivery page |
Authorization
Now the terms-of-delivery page is created and added to the menu,
the application can be started to add authorizations and display the page.
Add page to Access Control List (ACL)
User can only access pages for which they are authorized.
Open the ACL Type page and select object type Page.
Press the import objects to add all Java Page files to the ACL object list.
A message will confirm that a new ACL Object was added.
Add ACL Authorization
Open the ACL Role menu option and select the Page object types,
and the TermsOfDelivery entry.
Add new roles with maintenance rights.
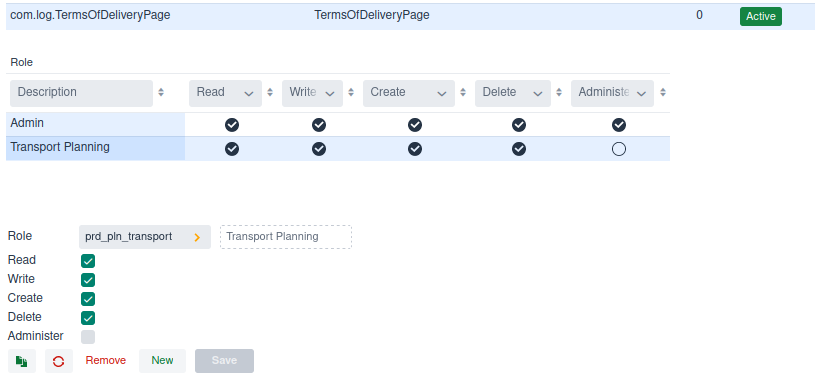
Refresh the web-page to see the added authorizations in the menus.
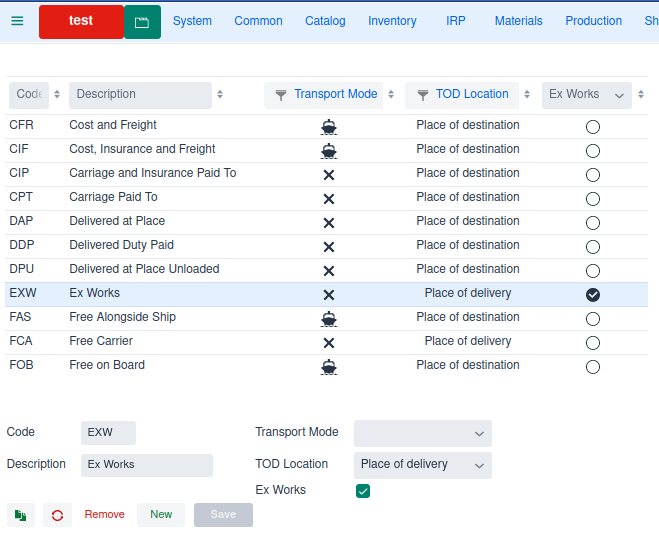
Select the new page
The end-result is a fully functional page where terms-of-delivery can be added, modified and deleted.
At any time custom logic can be added using Java,
simply by adding the custom keyword to entity, view-model,
form, grid or page.
Generated Code
Every DSL component generates one or more source files.
These generated files are located in a separate source folder and
not directly relevant for the developer.
None the less, it is good to have a general understanding of all the code,
including generated classes.
The generated source code is clean, structured and easy to understand.
In principle all these classes could also be written by hand.
However, the DSL code-generator makes it far more convenient and less error-prone
The DSL essentially reduces the source-code of the system as a whole.
Generated files are derived and not part of the source code and do not requiring maintenance.
This section goes through all the components mentioned in the Entity to Page section,
and provides an illustration of the generated code.
Server side project
Add labels
The label-set generates two code files:
(1) a Java class with label constants.
These are used in code to reference labels. Using constants in stead of string-values, ensures that name-changes result in compilation errors.
public class TermsOfDeliveryLabels{

 public static final String CODE_LABEL = "codeLabel";
 public static final String DESCRIPTION_LABEL = "descriptionLabel";
 public static final String EX_WORKS_LABEL = "exWorksLabel";
 public static final String TRANSPORT_MODE_LABEL = "transportModeLabel";
 public static final String TRANSPORT_MODE_LABEL_A = "transportModeLabelA";
 public static final String TRANSPORT_MODE_LABEL_I = "transportModeLabelI";
 public static final String TRANSPORT_MODE_LABEL_R = "transportModeLabelR";
 public static final String TRANSPORT_MODE_LABEL_S = "transportModeLabelS";
 ...
}
(2) a TermsOfDeliveryLabels.properties file.
This file can be translated using standard Java I18N functionality.
codeLabel=Code
descriptionLabel=Description
exWorksLabel=Ex Works
transportModeLabel=Transport Mode
transportModeLabelA=Air
transportModeLabelA.icon=AIRPLANE
transportModeLabelI=Rail
transportModeLabelI.icon=TRAIN
transportModeLabelR=Road
transportModeLabelR.icon=TRUCK
transportModeLabelS=Sea
transportModeLabelS.icon=BOAT
...
Add value types
Every value-type generates a Java class, an abstract class (except for enumerates), and a JPA converter class.
(1) Java class
public class TermsOfDeliveryCode extends AbstractTermsOfDeliveryCode{(1)
	public TermsOfDeliveryCode(final String value) {
		super(value);
	}
}| 1 | The abstract class implements the value-type, this concrete class only contains a constructor and can be moved to the manual source folder to add business logic. |
public enum TransportMode implements DomainEnumerate{ (1)

	AIR(EnumerateItem.create("A", "transportModeLabelA")) ,
	RAIL(EnumerateItem.create("I", "transportModeLabelI")) ,
	ROAD(EnumerateItem.create("R", "transportModeLabelR")) ,
	SEA(EnumerateItem.create("S", "transportModeLabelS"))
	;

	public static EnumerateMeta meta = EnumerateMeta.create(
		AIR.item,
		RAIL.item,
		ROAD.item,
		SEA.item
	);
	...
}| 1 | Java enum does not support inheritance, so there is only a concrete class |
(2) The Converter class provides a mapping between the database value and the value-type.
@Converter(autoApply = false)
public class TermsOfDeliveryCodeConverter
	implements AttributeConverter<TermsOfDeliveryCode, String> {

  @Override
  @NonNull public String convertToDatabaseColumn(
  	@Nullable final TermsOfDeliveryCode attribute) {(1)

    if(attribute!=null) {
      return attribute.getValue();
    }
    return "";
  }

  @Override
  @NonNull public TermsOfDeliveryCode convertToEntityAttribute(
    @Nullable final String dbData) {(2)

    if(dbData!=null) {
      return TermsOfDeliveryCode.of(dbData);
    }
    return TermsOfDeliveryCode.EMPTY;
  }
}| 1 | convert value type TermsOfDeliveryCode to a database string |
| 2 | convert a database string to a TermsOfDeliveryCode |
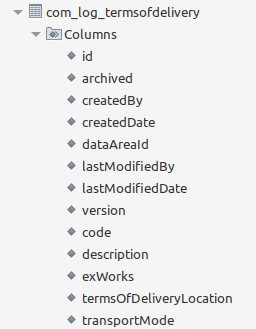
Add entity
The entity declaration creates a concrete entity class, an abstract entity class and two classes for setting operational- and user-fields.
@Access(AccessType.FIELD)
@Entity
@Table(name="com_log_termsofdelivery" (1)
,uniqueConstraints=@UniqueConstraint(columnNames={"code"}) (2)
)

public class TermsOfDelivery extends AbstractTermsOfDelivery{ (3)

	// Protected constructor required by Hibernate
	protected TermsOfDelivery(){
		super();
	}

	public TermsOfDelivery(
		@NonNull final TermsOfDeliveryCode code,
		@NonNull final Description description,
		@NonNull final TermsOfDeliveryLocation termsOfDeliveryLocation
		){

		super(
			code,
			description,
			termsOfDeliveryLocation
		);
	}
}| 1 | Class name is converted into a database table name. |
| 2 | The business key is converted into a uniqueness constraint |
| 3 | The abstract class implements the entity, this concrete class only contains a constructor and can be moved to the manual source folder to add business logic. |
The entity class is by default read-only, all the setters are contained
in a specialized user class for user-fields, and update class for operational fields.
Add view-model
@ViewModelComponent
public class TermsOfDeliveryViewModel extends AbstractTermsOfDeliveryViewModel{(1)
}| 1 | The abstract class implements the view-model, this concrete class is empty
and can be moved to the manual source folder to add business logic. |
Client side project
Add grid
The generated Java code uses a grid-builder to create the layout.
Constants are added for all form-fields that can be referenced in custom page logic.
public class TermsOfDeliveryGrid{

	@NonNull public static final String CODE = "code";
	@NonNull public static final String DESCRIPTION = "description";
	@NonNull public static final String TRANSPORT_MODE = "transportMode";
	@NonNull public static final String TERMS_OF_DELIVERY_LOCATION =
		"termsOfDeliveryLocation";
	@NonNull public static final String EX_WORKS = "exWorks";

	public static <T> GridBuilder<T> create(final GridBuilder<T> builder)(1)
		throws ClientException{

		builder
		.add(CODE)
		.add(DESCRIPTION)
		.add(TRANSPORT_MODE)
		.add(TERMS_OF_DELIVERY_LOCATION)
		.add(EX_WORKS)
		;

		return builder;
	}
}| 1 | the grid builder input parameter |
Add form
The generated Java code uses a form-builder to create the layout.
Constants are added for all form-fields that can be referenced in custom page logic.
public class TermsOfDeliveryForm{

	@NonNull public static final String CODE = "code";
	@NonNull public static final String DESCRIPTION = "description";
	@NonNull public static final String TRANSPORT_MODE = "transportMode";
	@NonNull public static final String TERMS_OF_DELIVERY_LOCATION
		= "termsOfDeliveryLocation";
	@NonNull public static final String EX_WORKS = "exWorks";

	public static <T> FormBuilder<T> create(final FormBuilder<T> builder)
		throws ClientException{

		builder
		.beginSection()
			.addField(CODE)
			.addField(DESCRIPTION)
			.nextColumn()
			.addField(TRANSPORT_MODE)
			.addField(TERMS_OF_DELIVERY_LOCATION)
			.addField(EX_WORKS)
		.endSection();
		return builder;
	}
}
Add page
The page declaration generates an concrete Java class with only a constructor,
and an abstract Java class with the page logic.
@PageTitle("TermsOfDeliveryPage")
@Page
public class TermsOfDeliveryPage extends AbstractTermsOfDeliveryPage{

	public TermsOfDeliveryPage(
			@Autowired final PageService pageService,
			@Autowired final VComponentService componentService)
			throws ClientException{

		super(pageService, componentService);

		initialize();
	}

}
The abstract page class can extend any Vaadin page component.
@Route(value = "termsOfDeliveryPage", layout = VMainLayout.class)
@PermitAll
public class AbstractTermsOfDeliveryPage extends Div implements HasClientViewModel{
...
}
It declares the view-model and views.
protected final DefaultClientViewModel todViewModel;

protected final Component termsOfDeliveryGrid;
protected final Component termsOfDeliveryForm;

protected final AclAuthorization pageAuthorization;
and instantiates them in the constructor.
public AbstractTermsOfDeliveryPage(
	@Autowired final PageService pageService,
	@Autowired final VComponentService componentService) throws ClientException{

	todViewModel = pageService.createViewModel(
		TOD_VIEW_MODEL_NAME,
		getViewModelAuthorization(TOD_VIEW_MODEL));

	termsOfDeliveryGrid = createTermsOfDeliveryGrid();
	termsOfDeliveryForm = createTermsOfDeliveryForm();
}
finally the page is constructed using a page-builder.
protected void createLayout() throws ClientException{
	final VLayoutBuilder layoutBuilder = componentService.createLayoutBuilder();

	layoutBuilder
		.beginVertical()
			.addAndExpand(termsOfDeliveryGrid_
			.add(termsOfDeliveryForm)
		.endVertical();

	add(layoutBuilder.getComponent());
	setSizeFull();
}
Add menu
@Service
public class Menu_com_log{

	private final LabelProvider labelProvider;

	@Inject
	public Menu_com_log(final LabelProvider labelProvider) {
		super();
		this.labelProvider = labelProvider;
	}

	...

	public void addItems(
			final HasMenuItems hasMenuItems,
			final MenuSelectionHandler handler) {

		hasMenuItems.addItem(
			labelProvider.getLabel("COM_Labels.numberSeriesLabel")(1)
			.getDescription(),
			(e)->handler.openPage("numberSeriesPage"));

		hasMenuItems.addItem(
			labelProvider.getLabel("COM_Labels.termsOfDeliveryLabel")
			.getDescription(),
			(e)->handler.openPage("termsOfDeliveryPage"));

		hasMenuItems.addItem(
			labelProvider.getLabel("COM_Labels.uomLabel")
			.getDescription(),
			(e)->handler.openPage("uOMPage"));
	}
}| 1 | Use of constants is not required as menus can not be sub-classed. |
Core concepts
One language
An organization with limited resources is best served with the simplicity of one programming language.
For Wercstat this means Java, both server-side and client-side.
This simplifies training and hiring of developers.
Nonetheless, it is still possible to integrate with client-side languages or frameworks like
JavaScript, Angular, Vue or React if required.
Less code
Less code means less hours spent on development and testing, less bugs, less legacy and less maintenance. In practice this means higher productivity, lower cost of ownership, better quality and agility.
But some code can not be avoided, in that case the best alternative is
to generate code where possible.
Wercstat generates code according to strict architectural patterns,
improving code discoverability and preventing code duplication.
Generated code is not part of the application source-code, it does not need maintenance and can be automatically updated when required, for instance to include new technologies. |
Business Developers
Wercstat supports both Business Developers and Technical Developers.
Business Developers use high level abstractions, comparable to 4GL languages,
to implement business functionality.
They do not need to know all the technical details of Java,
only enough to code user requirements.
Technical Developers know the Java language in all its technical details.
They develop more specialized requirements like web-services,
custom UI components (e.g. plan-board) and interfaces with external systems
(barcode-scanners, SCADA, etc.).
Everything is text
All application components are defined and stored in simple text files. This includes business-logic, entity definitions, user interfaces, external dependencies and documentation.
Benefits:
Text is the most open, accessible and future proof format.
Database structures, dependencies and documentation are stored and versioned (GIT) together with the business code.
Code close to the business
Not only business entities are represented in code,
but also primitive Java types (Boolean, String, BigDecimal, etc.) are replaced with business concepts like Confirmed, Document and Amount.
Benefits:
The same business-terms (e.g. Price, Rate, OrderLine) are used both in the specification and the source code.
This narrows the communication gap between developers and domain experts.
Improved type checking during development will catch errors early.
A Price is different from an Amount, a CustomerReference is different from a Description.
These differences are checked at development-time.
Compare this with Java primitive types, where all business-concepts are represented by the same set of primitive types
and mistaking a document-code for a reference-number only become apparent when tests fail.
User interaction is business logic
Most user-interaction is handled on the server side, as part of the business logic. For example the visibility of fields and buttons, making fields editable or read-only, amending user input, setting field defaults, opening selection-screens, adding grid filters and showing error messages. All is handled server-side.
Benefit:
UI logic is business-logic, and implementing it on the server side makes it possible to change UI technology in the future, if needed.
Develop at all levels of abstraction
Wercstat allows developers to work at all levels of abstraction,
from the Wercstat-DSL down to plain Java.
Anything the Werstat DSL provides, can also be achieved using plain Java.
A good example are the abstraction levels available for building UI’s.
DSLDevelopers can create pages, grids, forms and menus using the extensive Wercstat-DSL.
The DSL internally uses Java UI-builders.
These UI-builders are also available for developers if they need more control.
Developers can create pages, grids, forms and menus using UI-builders.
The UI-builders internally use Wercstat component-factories to create UI-components,
and component-binders to connect these to the client-side view-model.
These component-factories and component-binders are also available for developers if they need more control.
Developers can create pages, grids, forms and menus using component-factories and component-binders.
The Wercstat component-factories internally use Vaadin components,
and the component-binders listen to view-model events to bind them together.
These Vaadin components and client view-model events are also available for developers if they need more control.
Developers can create pages, grids, forms and menus can by using Vaadin components and connecting them to the view-model by listening to view-model events.
Developers can choose not to use the Wercstat framework and create a custom solution on top of the industry-standard Java and Spring stack.
Benefit:
The developer is not restricted in any way, and can choose the abstraction that matches the level of control needed.
Anywhere between 80% and 100% of the user interface will be created using the And of course, different levels of abstraction can be combined within a single UI page. |
No null-pointer exceptions
Nullability annotations are implemented throughout the framework, including generated code. This eliminates not only null-pointer exceptions but also the need to add null-checks or assertions in business code.
| When using external libraries, null-pointer exceptions can still occur. |
Entity constructors, getters and setters have Nullability annotations for parameters and return values.
If an entity field is mandatory, the getter will return a @NonNull value,
and the setter will take a @NonNull parameter.
And if the field is not calculated, a @NonNull parameter is added to the constructor
to ensure that no instance of the entity can be created without a valid field value.
Benefit:
Null-pointer exception is the most prevalent error in Java applications.
Eliminating it greatly improves the application stability and ultimately user experience.
Minimal vendor lock-in
Wercstat only depends on industry standard open source components
which are widely used and supported by commercial companies.
Wercstat also aims to reduce its own vendor lock-in as much as possible.
Most business logic can be developed with no dependency on the Wercstat framework.
Entities, repositories and value-types depend only on the com.wercstat.domain submodule.
This dependency can be easily replaced by bespoke code or libraries from other vendors.
The user interaction (UI) logic is more dependent on the framework. Replacement with other UI solutions is manageable, but will need effort depending on the target platform.
And of course, everything is text, no proprietary formats or structures stored in obscure database tables.
Benefit:
A lower threshold to start using the Wercstat framework,
and the future ability to switch should the need occur.
Commercial Support
Wercstat is a complex framework for a specialized market.
Stability, continuity and innovation is essential for customers.
The fact that Wercstat is a commercially viable product,
has a loyal customer base and has a sixteen year track-record,
guarantees continuity and long term support.
Benefit:
Wercstat systems will stay up-to-date with modern technology.
No more big-bangs or application rewrites.
Wercstat-ERP
Overview
The example application presented here is Wercstat-ERP and is built using the Wercstat-Framework.
Over time this application will replace a legacy InforLN ERP system by incrementally moving functional modules from InforLN to Wercstat-ERP.
During this process a robust integration with the existing ERP system is key.
Functionality
Central to the application are the order entry and planning modules.
Sales orders are created automatically based on either B2B messages,
or PDF order-confirmations received by email.
If needed sales representatives can amend the order, with the PDF and mail information available in Wercstat-ERP.
Once the order is confirmed it is forwarded to the legacy ERP system,
and a work-preparation document is created in Wercstat-ERP.
The work-preparation document contains tasks for the planning of
materials, production-capacity, outsourcing and transport.
Once the planning is completed, including inter-company purchases,
the sales representative is informed by email.
The email contains the planning details and a direct HTTP link to the sales order in Wercstat-ERP.
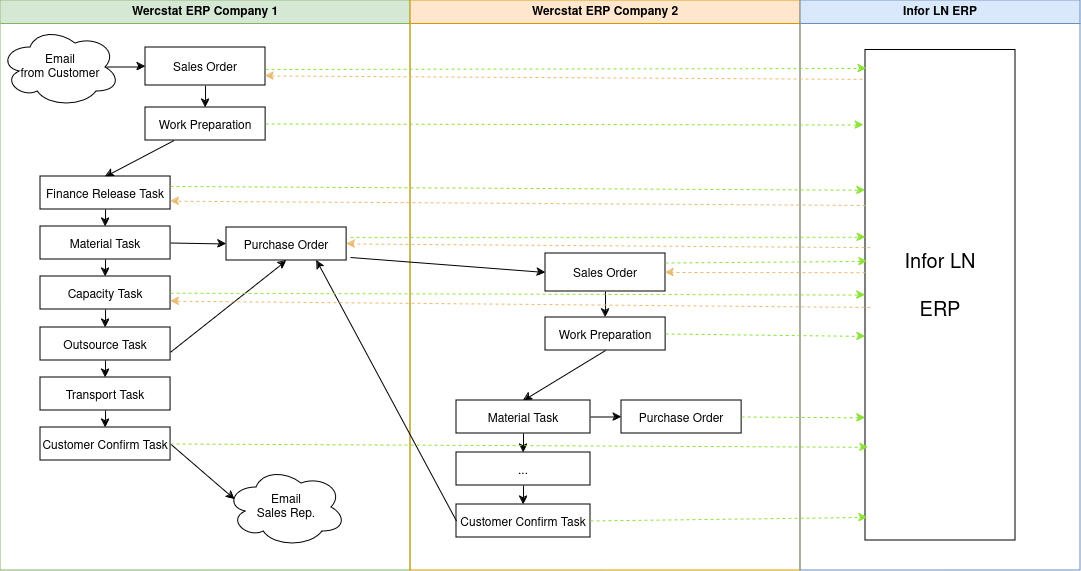
When the module was first build most tasks were completed manually by end users. Over time more and more tasks are handled by background jobs, based on lead-time calculation rules.
All sales and purchase orders, together with the production planing,
are fed into the legacy InforLN ERP system.
The |
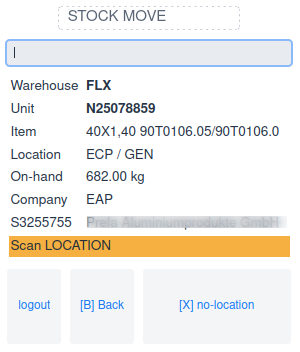
The starting page is configured per user-group. Forklift drivers for example start with the scanning page on their mobile device:
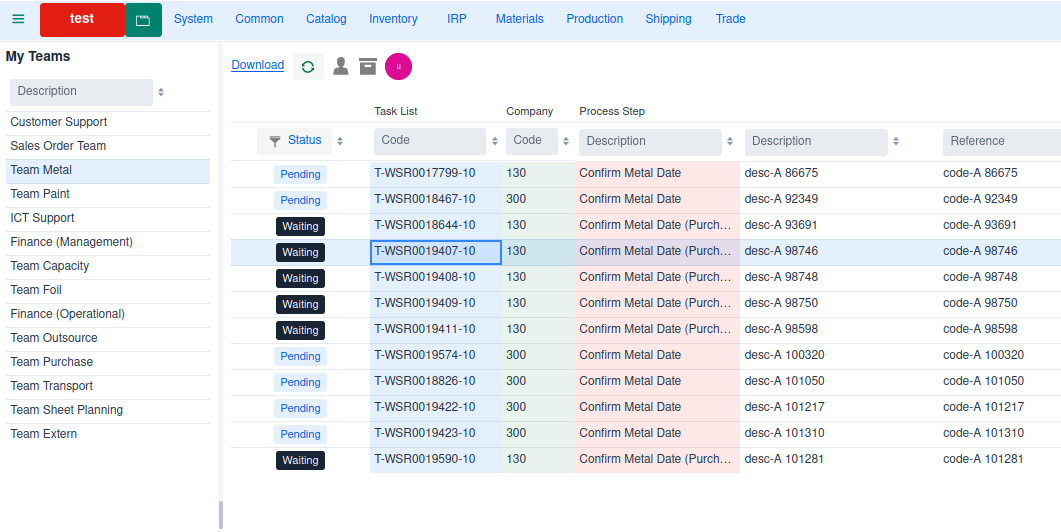
Office users start with the workflow task screen:
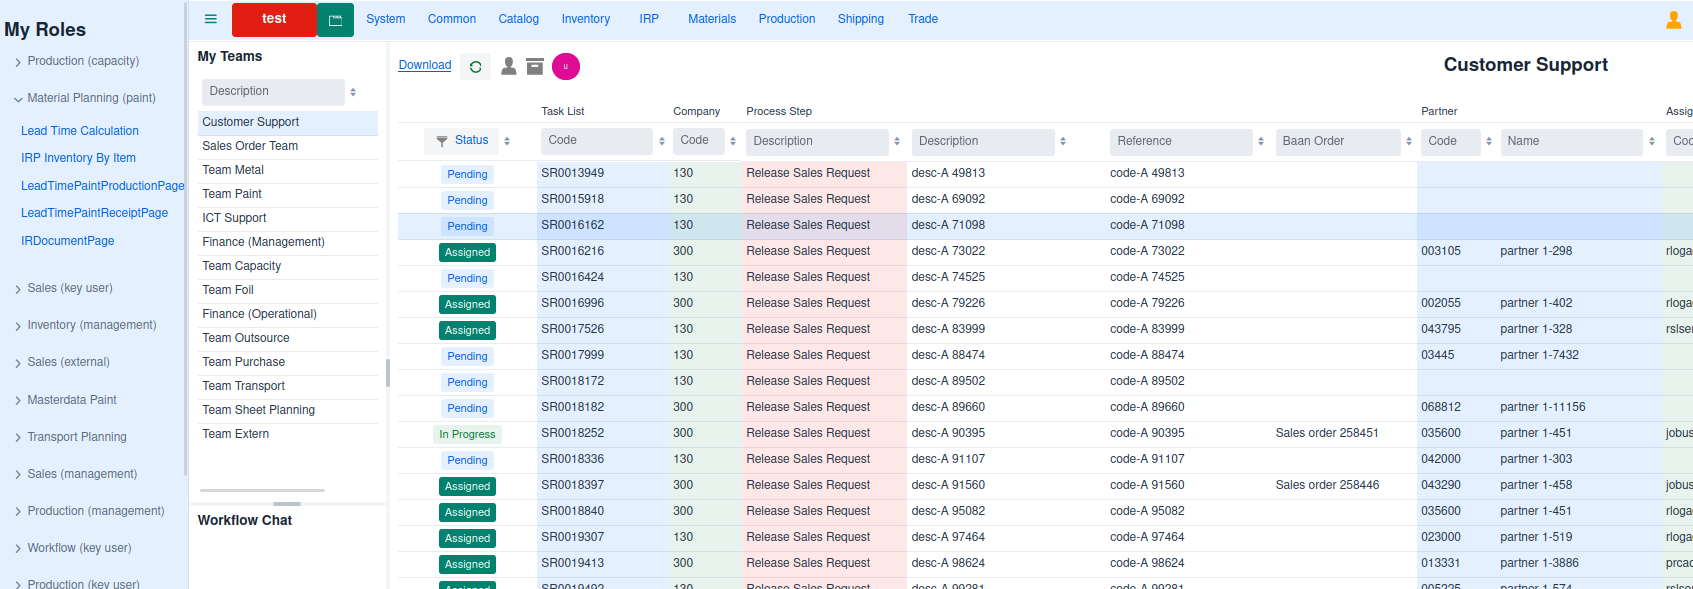
Desktop pages have a collapsible section on the left with the roles of the user.
Next is the workflow page with on the left a list of all teams that the user is a member of, and finally a list with pending tasks.
Double-clicking a task-line of the customer support team will open the sales order.
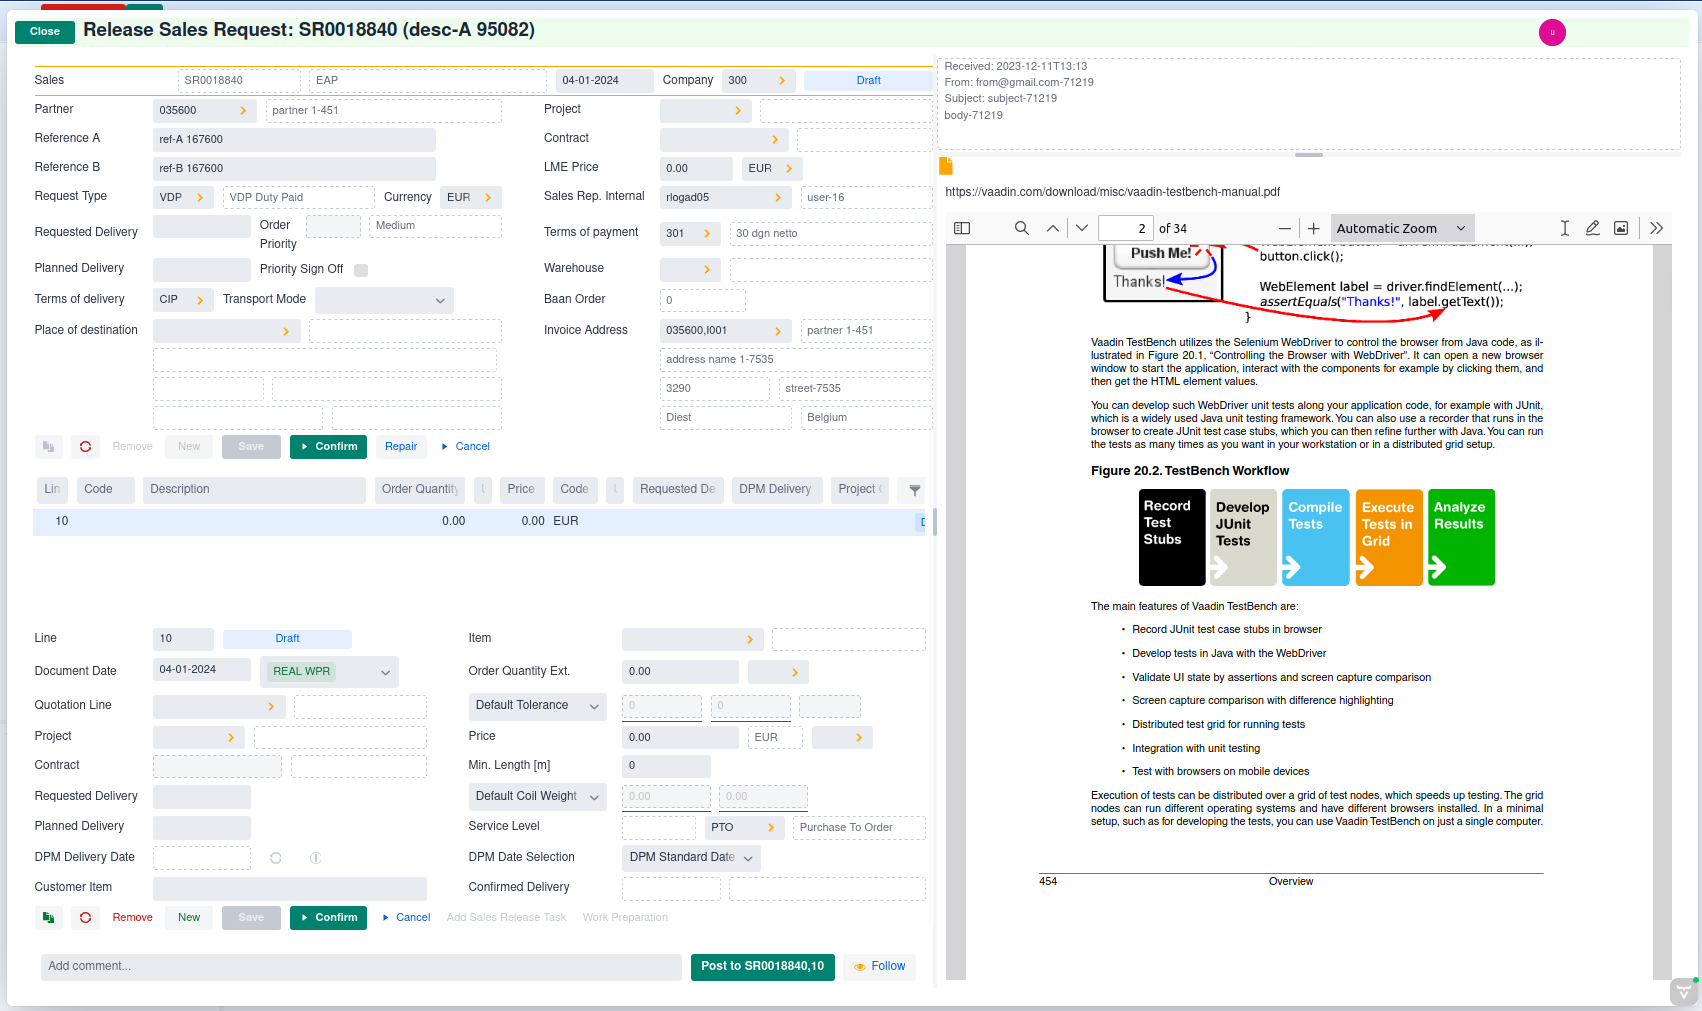
All fields are editable and the confirm button is available.
This changes the moment the order is confirmed.
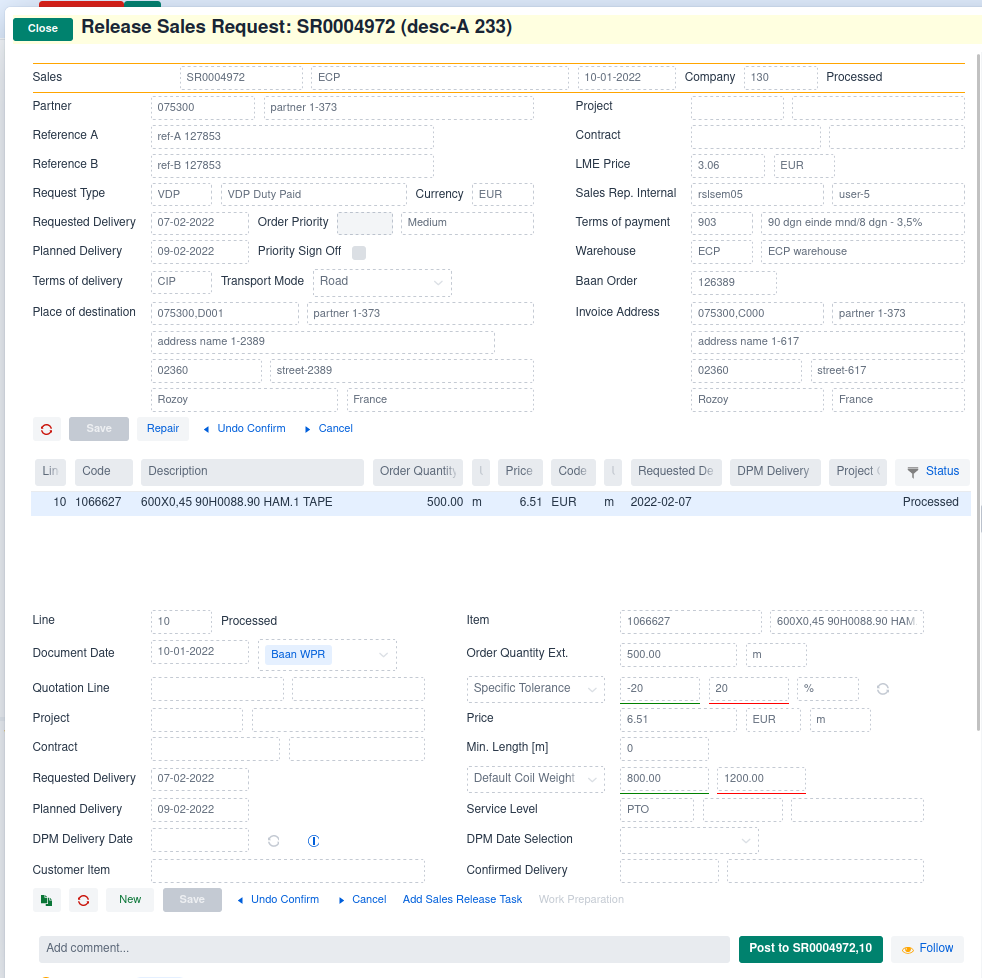
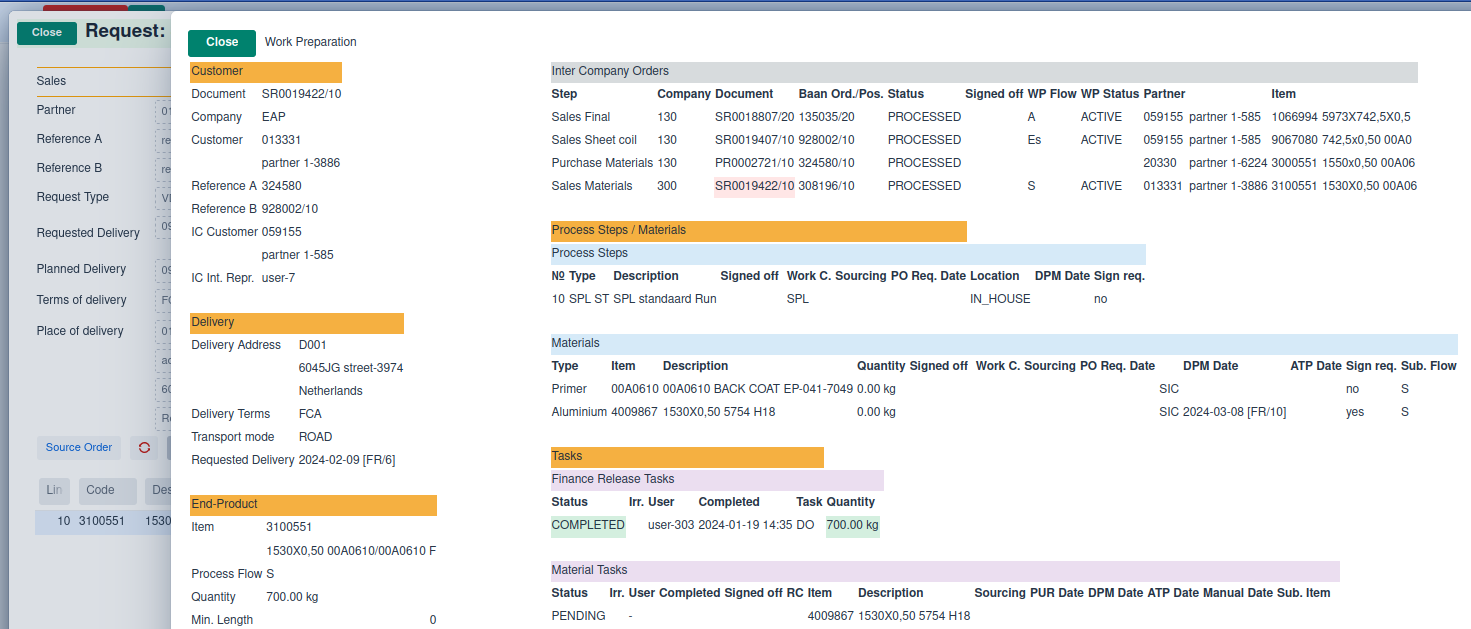
Once the sales order is confirmed, the work preparations starts and workflow-tasks are created.
The metal waiting task is the result of input material that has to be purchased inter-company.
Double clicking the metal waiting task will open the task page.
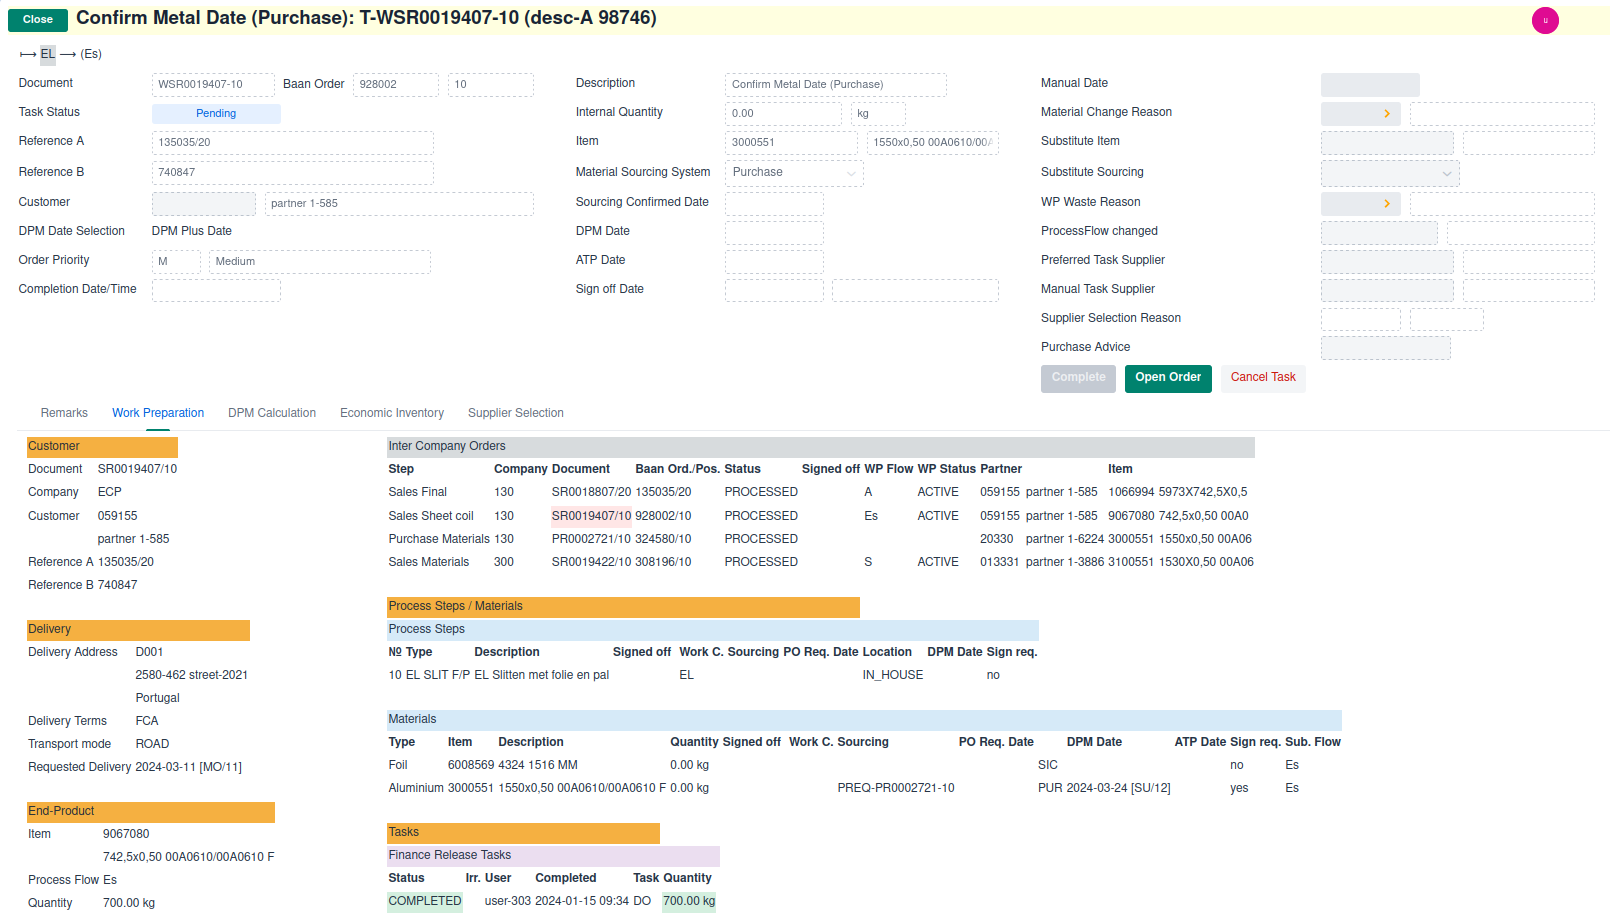
The material task is linked to a purchase order.
Selecting the Open Order button displays the purchase order.
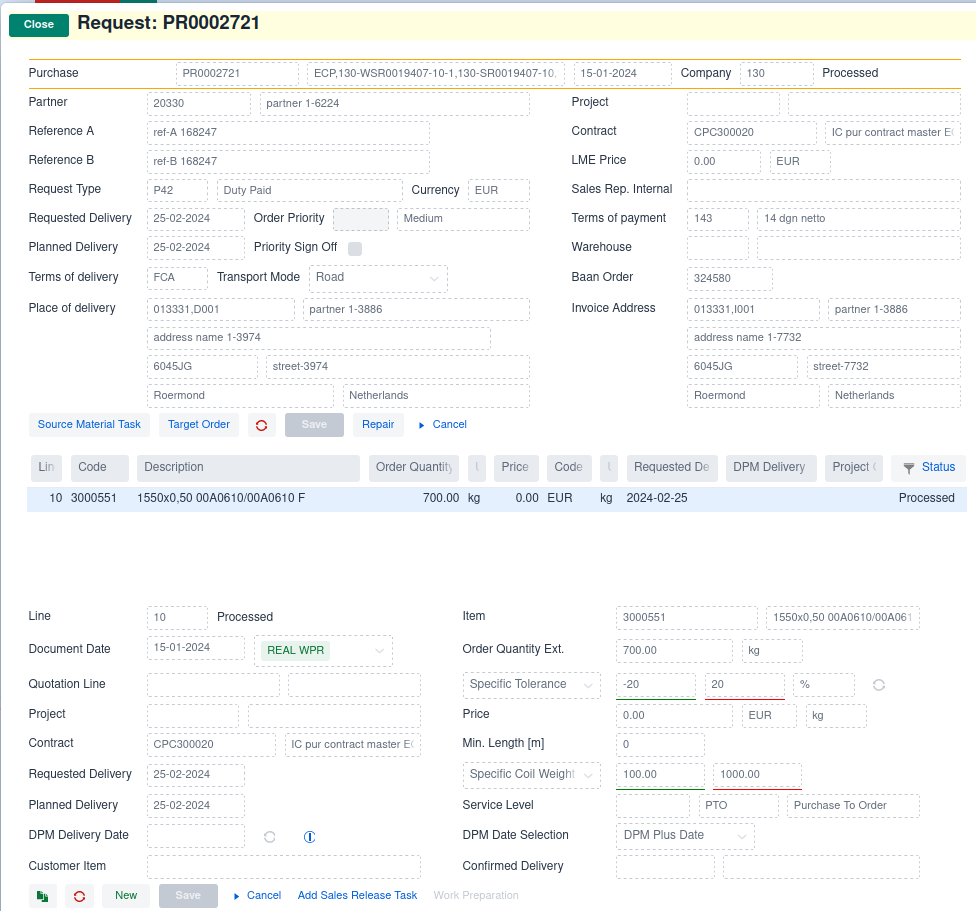
As this is an inter-company purchase, the order generates a sales order in the supplying company.
Selecting the Target Order button displays the inter-company sales order.
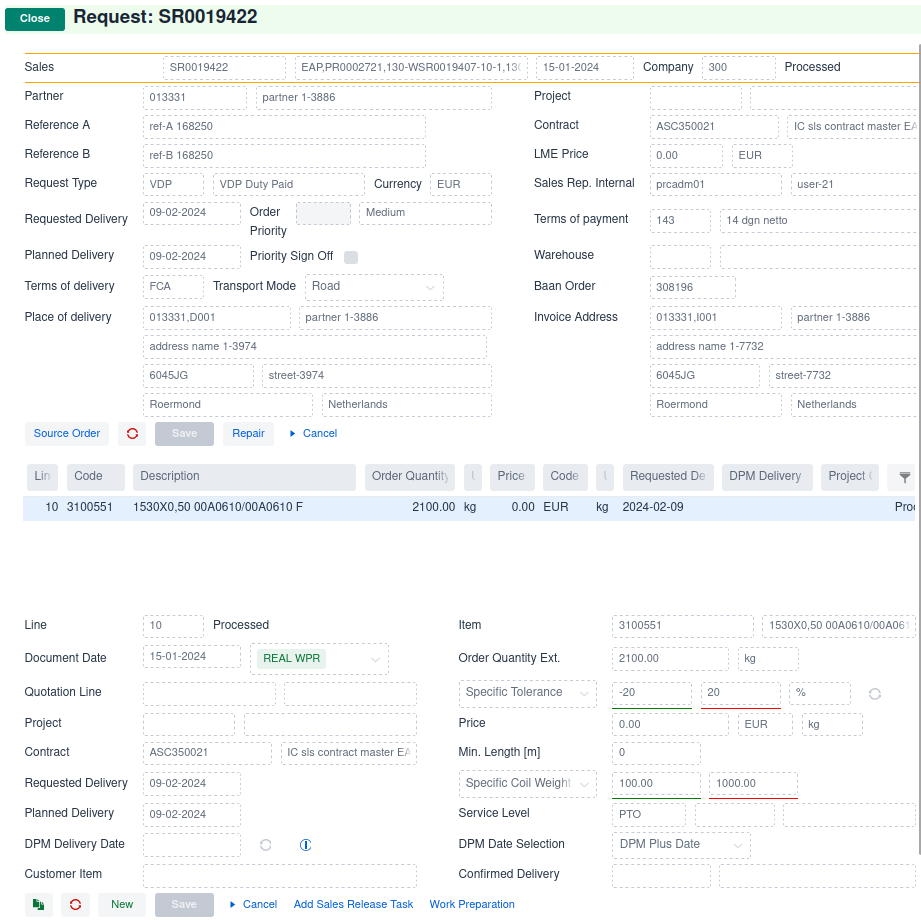
Subsequently, in the supplying company a new work-preparation process is started, with all the tasks required to produce the requested material.
Implementation
Wercstat-ERP consists of nine main modules with strict uni-directional dependencies.
For example, module production can refer to materials or finance,
but can not reference module trade.

Projects
The Wercstat-ERP main modules are implemented as Eclipse code-projects
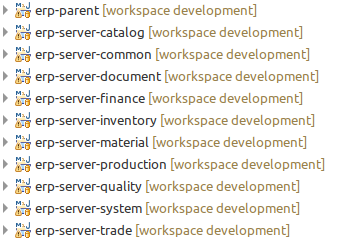
There are additional |
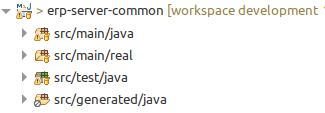
Folders
Every Eclipse project has source-folders for manual Java-code (.java files),
generated Java-code and domain-model files (.real files).
| Source folder | Content |
|---|---|
| business logic |
| domain model |
| automated tests |
| database and UI |
|
Domain Model
The domain model is structured around organizational modules and submodules.
It consists of .real files which define entities, forms, grids, pages, menu’s, etc.
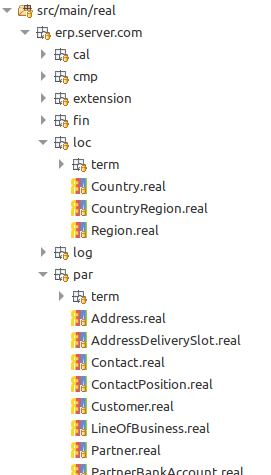
Packages
The Java code automatically follows the domain model structure.
Tables
The same applies to the automatically generated database tables:
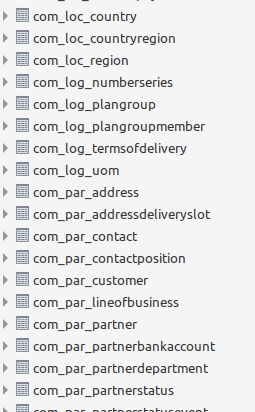
The end-result is a consistent ERP application where business logic is clearly structured and maintainable, even when it grows to hundreds of entities.
Although discouraged, you can use alternative table and table-field names. |
Code Structure
Modules
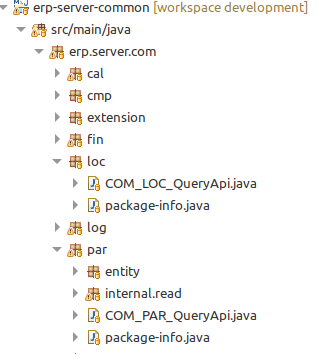
Wercstat-ERP packages have the following structure:
com.wercstat.erp.server.<module>.<submodule> or
com.wercstat.erp.client.<module>.<submodule>
for example com.wercstat.erp.server.trd.req and com.wercstat.erp.client.prd.pln
Every sub-module has a fixed set of sub-packages and classes.
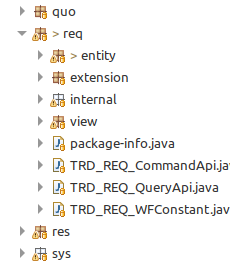
Public module API
The main sub-package of every module exposes the public interface (API).
This includes sub-packages:
entity: contains all module entitiesextension: contains interfaces that module entities can implementview: contains all moduleview-models
and the following public classes:
TRD_REQ_CommandApi: is a facade to module business functionality where data is updatedTRD_REQ_QueryApi: is a facade to module business functionality where data is readTRD_REQ_Constant: public module constants
External modules can only access packages or classes from the public API.
Private module implementation
The internal sub-package contains the actual implementation of business logic
and is not accessible from outside the module.
As in the public API (TRD_REQ_CommandApi, TRD_REQ_QueryApi) the
internal business logic is divided into a read and write sub-package.
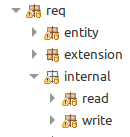
Read / Write separation
Write methods update the database and can have side-effects in the system.
They often contain the majority of the critical to business logic.
Read methods have no side effects and often contain less business logic.
By separating updates from reads (and commands from queries), it is easier to reason about the interaction between modules.
prd.wpr.With Eclipse search functionality it is easy to see that update methods
in the sub-module prd.wpr are only called from sub-module trd.req and prd.irr.
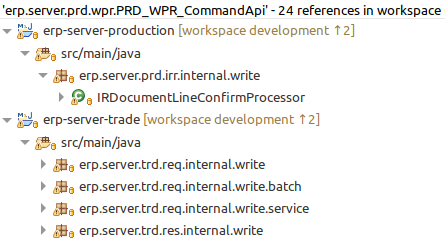
In this case that makes sense because only sales orders (trd.req) and
production irregularities (prd.irr) can update work preparation (prd.wpr).
Considerer the supporting services that the following Java class declares:
@Service
public class MRequestLineActionWriter {

	private final DOC_COM_CommandApi doc_com_CommandApi;
	private final PRD_WPR_CommandApi prd_wpr_CommandApi;

	private final COM_PAR_QueryApi com_par_QueryApi;
	private final PRD_BAS_QueryApi prd_bas_QueryApi;
	private final PRD_WPR_QueryApi prd_wpr_QueryApi;
	...

}
It is instantly clear that this method only updates the doc.com and prd_wpr sub-modules.
Again in this case it makes sense, because the class contains actions
from the sales line web-page. And the sales line calls doc.com for
a new sales order number (which updates the number-series), and calls
prd.wpr to start work-preparation.
Should there be any other CommandApi services, then this might indicate architectual issues.
Rule enforcement
Wercstat-ERP enforces the architectual rules using archunit ( https://www.archunit.org/ ).
Part of these rules are automatically generated by the Wercstat-ERP module structure.
And for general code quality, ErrorProne ( https://errorprone.info/ ) static checks have been added to the build process.
Order Entry Page
One of the UI pages in the trade project, is used for sales-order entry:

This page manages content form five different database tables:
Sales Order
Sales Order Line
User Comments
Mail Message
Mail Message Attachments
All interaction between the UI components, and the interaction with the
server-side view-models is handled by the Wercstat framework.
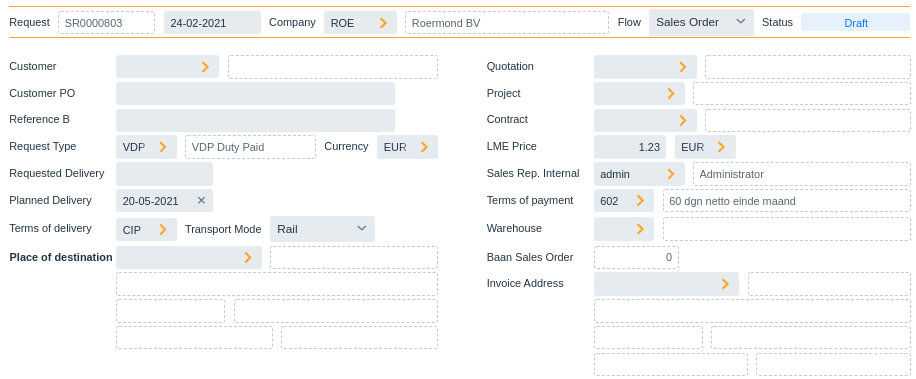
Form
The top left form in the Order Entry Page contains the order-header:
The complete form declaration using the DSL is as follows:
form MRequestForm
{
	viewmodel MRequestViewModel

	row header {
		label-code mRequestLabel
		value documentCode
		value documentDate
		field company
		value company/description
		field requestType
		field biRequestStatus
	}

	field partner [name]

	field referenceA
	field referenceB

	label requestType
	row {
		value requestType
		value requestType/description
		field currency
	}

	field requestedDeliveryDate
	field plannedDeliveryDate

	label termsOfDelivery
	row {
		value termsOfDelivery
		field transportMode
	}

	value-label termsOfDelivery/termsOfDeliveryLocation
	row {
		value deliveryAddress
		value deliveryAddress/partner/name
	}
	tab value deliveryAddress/name1
	tab row {
		value deliveryAddress/zipcode
		value deliveryAddress/street
	}
	tab row {
		value deliveryAddress/city
		value deliveryAddress/country/description
	}

	next-column

	field quotation [description]
	field project [description]
	field contract [description]

	label lmePrice
	row {
		value lmePrice
		value lmeCurrency
	}

	field representativeInt [name]
	field termsOfPayment [description]
	field warehouse [description]
	field baanOrno

	label invoiceAddress
	row {
		value invoiceAddress
		value invoiceAddress/partner/name
	}
	tab value invoiceAddress/name1
	tab row {
		value invoiceAddress/zipcode
		value invoiceAddress/street
	}
	tab row {
		value invoiceAddress/city
		value invoiceAddress/country/description
	}

}
The form declaration uses the following key-words:
row { <fieldList> } | marks a list of fields which are displayed on the same row |
label <fieldName> | display the label of |
value <fieldName> | display the value of a |
field <fieldName> | display both the label and the value of a |
tab | skip the label or value column |
Header Row
Let’s look in more detail, beginning with the header row:

defined as follows:
row header { (1)
	label-code mRequestLabel (2)
	value documentCode (3)
	value documentDate (4)
	field company (5)
	value company/description (6)
	field requestFlow (7)
	field biRequestStatus (8)
} (9)| 1 | start a list of fields and labels that are displayed as one row. |
| 2 | display the label with code mRequestLabel. This will display Request. |
| 3 | display the value of the documentCode field. This will display SR0000803. |
| 4 | display the value of the documentDate field. This will display 24-02-2021. |
| 5 | display the company field. This will display Company and ROE. |
| 6 | display the value of the company/description field. This will display Roermond BV. |
| 7 | display the requestFlow field. This will display Flow and Sales Order. |
| 8 | display the biRequestStatus field. This will display Status and Draft. |
| 9 | end the list of row fields |
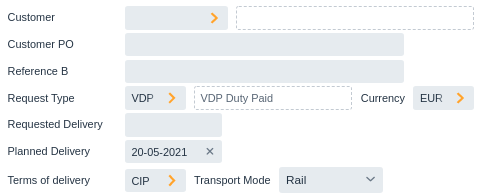
Left Column
Next the first part of the left column:
field partner [name] (1)

field referenceA (2)
field referenceB

label requestType (3)
row { (4)
	value requestType
	value requestType/description
	field currency
}

field requestedDeliveryDate (5)
field plannedDeliveryDate

label termsOfDelivery (6)
row {
	value termsOfDelivery
	field transportMode
}| 1 | Display the partner field, followed by partner/name. This will display label Customer, the customer input field
and the customer name. The square brackets [] are a special short-cut making it easier to add foreign-entity fields. |
| 2 | Add the refrenceA label and value. |
| 3 | Add only the label requestType. |
| 4 | Start a row of fields, containing the value of requestType, the value of requestType/description, and the label and value of currency. |
| 5 | Display the label and value of requestedDeliveryDate and plannedDeliveryDate |
| 6 | Add label of field termsOfDelivery, and display a row with the value of termsOfDelivery and both the label and value of transportMode. |
The second part of the left column simply displays an address:
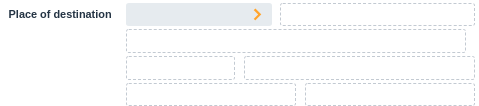
value termsOfDelivery/termsOfDeliveryLocation (1)
row { (2)
	value deliveryAddress
	value deliveryAddress/partner/name
}
tab value deliveryAddress/name1 (3)
tab row { (4)
	value deliveryAddress/zipcode
	value deliveryAddress/street
}
tab row { (5)
	value deliveryAddress/city
	value deliveryAddress/country/description
}

next-column (6)| 1 | termsOfDelivery/termsOfDeliveryLocation displays the location belonging to the terms of delivery. |
| 2 | add a row with the deliveryAddress input field, and partner-name belonging to the address |
| 3 | display name field of the delivery address itself. |
| 4 | display zipcode and street of the delivery address. |
| 5 | display city and countr/description of the delivery address. |
| 6 | start a new column |
The right column uses all the same concepts and should be self explanatory.
Label and value subcolumns
Note that columns are subdivided into a label sub-column and a value sub-column. This allows easy alignment of field-values and make the form easier to read.
For example:
field referenceBdisplays the label in the label-column, and field value in the value-column:

label termsOfDelivery
row {
	value termsOfDelivery
	field transportMode
}
displays the termsOfDelivery label in the label-column, and the field termsOfDelivery and transportMode in the value-column:

tab row {
	value deliveryAddress/zipcode
	value deliveryAddress/street
}
skip the label-column, and displays zipcode and street in the value-column:

Generated Code
The generated code is more verbose, but still easy to understand:
public static <T> FormBuilder<T> create(final FormBuilder<T> builder) throws ClientException{

	builder
	.beginSection()
		.beginCell(FormCellType.HEADER)
			.addValueReadOnly(REQUEST_TYPE_MTYPE)
			.addValue(DOCUMENT_CODE)
			.addValue(LINKED_DOCUMENTS)
			.addValue(DOCUMENT_DATE)
			.addField(COMPANY)
			.addValue(BI_REQUEST_STATUS)
		.endCell()
		.addField(PARTNER,"name")
		.addLabel(REFERENCE_A_LABEL)
		.beginCell(FormCellType.LINE)
			.addValue(REFERENCE_A)
			.addValue(REFERENCE_WARNING)
			.cssClass("real-field-warning")
		.endCell()
		.addField(REFERENCE_B)
		.addLabel(REQUEST_TYPE_LABEL)
		.beginCell(FormCellType.LINE)
			.addValue(REQUEST_TYPE)
			.addValue(REQUEST_TYPE_DESCRIPTION)
			.addField(CURRENCY)
		.endCell()
		.addLabel(REQUESTED_DELIVERY_DATE_LABEL)
		.beginCell(FormCellType.LINE)
			.addValue(REQUESTED_DELIVERY_DATE)

		...
}
Deployment
Wercstat-ERP has so called xcopy deployment, which means you can simply copy application files
to a server-directory and start the application. Providing the server has Java runtime-edition installed.
The directory only needs two files; the application itself erp-trade-client-1.6.7.jar
and a file with settings application.properties.
Create the JAR artifact
The Maven POM has a special production profile for deployment in production environment.
mvn install -Pproduction
This profile adds code optimization and packaging for front-end artifacts.
Execute the trade-client-install (production) launch to create the deployment Java archive file (JAR-file).
[INFO] ------------------------------------------------------------------------
[INFO] Reactor Summary for ERP Parent 1.6.7:
[INFO]
[INFO] ERP Parent ......................................... SUCCESS[  0.235 s]
[INFO] ERP Shared ......................................... SUCCESS[  0.503 s]
[INFO] ERP System Server .................................. SUCCESS[  7.656 s]
[INFO] ERP Common Server .................................. SUCCESS[  6.975 s]
[INFO] ERP Catalog Server ................................. SUCCESS[  4.912 s]
[INFO] ERP Document Server ................................ SUCCESS[  3.044 s]
[INFO] ERP Finance Server ................................. SUCCESS[  1.409 s]
[INFO] ERP Inventory Server ............................... SUCCESS[  3.512 s]
[INFO] ERP Quality Server ................................. SUCCESS[  1.263 s]
[INFO] ERP Warehousing Server ............................. SUCCESS[  1.389 s]
[INFO] ERP Material Server ................................ SUCCESS[  4.173 s]
[INFO] ERP Production Server .............................. SUCCESS[  9.909 s]
[INFO] ERP Quality Server ................................. SUCCESS[  0.026 s]
[INFO] ERP Trade Server ................................... SUCCESS[  4.918 s]
[INFO] ERP Planning Server ................................ SUCCESS[  2.876 s]
[INFO] ERP Trade Batch .................................... SUCCESS[  0.957 s]
[INFO] ERP System Client .................................. SUCCESS[  2.665 s]
[INFO] ERP Trade Client ................................... SUCCESS[ 10.940 s]
[INFO] ------------------------------------------------------------------------
[INFO] BUILD SUCCESS
[INFO] ------------------------------------------------------------------------
The Wercstat-ERP version number is automatically added to the JAR-file name, for example erp-trade-client-1.6.7.jar.
Deploy the JAR artifact
Normally every server has a fixed application.properties file with specific settings, including the database connection.
Deploying the application is as easy as copying the compiled artifact (the .jar file) and starting it from Java:
java -jar erp-trade-client-1.6.7.jar & (1)| 1 | the & parameters starts the application in the background |
The following banner is displayed on start-up:
__          __               _        _     ______ _____  _____
\ \        / /              | |      | |   |  ____|  __ \|  __ \
 \ \  /\  / /__ _ __ ___ ___| |_ __ _| |_  | |__  | |__) | |__) |
  \ \/  \/ / _ \ '__/ __/ __| __/ _` | __| |  __| |  _  /|  ___/
   \  /\  /  __/ | | (__\__ \ || (_| | |_  | |____| | \ \| |
    \/  \/ \___|_|  \___|___/\__\__,_|\__| |______|_|  \_\_|
Monitoring
The application is monitored in three ways:
Server-logging (
Log4J) for normal logging and exception stack tracesHealth monitoring and metrics gathering (
Spring Boot Actuator)Cloud exception monitoring (
bugSnag)Custom monitoring
Server-logging and health monitoring are build-in features of Spring Boot.
Cloud Monitoring
Wercstat supports cloud monitoring, in this case BugSnag ( https://www.bugsnag.com/ ),
but any service can be integrated.
All exceptions in Wercstat-ERP are sent to the cloud with information
about the server, the user and a complete Java stack trace.
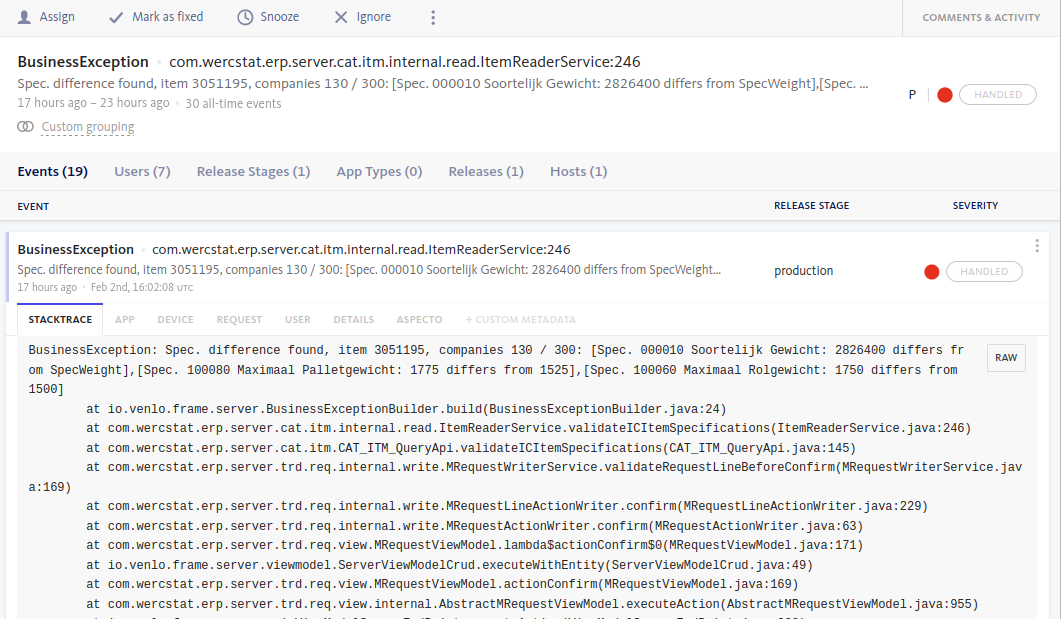
The overall occurrence of errors over time is monitored:
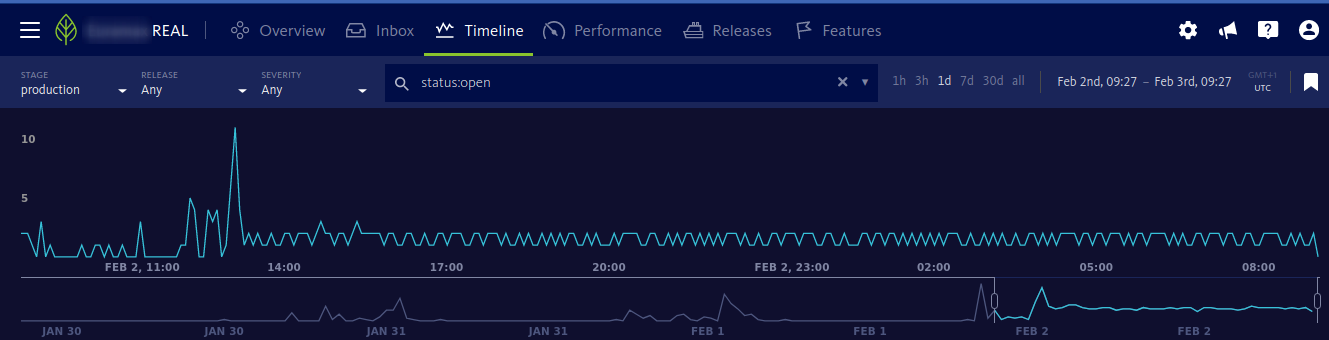
Support staff can be informed of errors by email based on specific business-rules. For example, the type of exception, the frequency of the exception or the server where the exception occurred.
Custom Monitoring
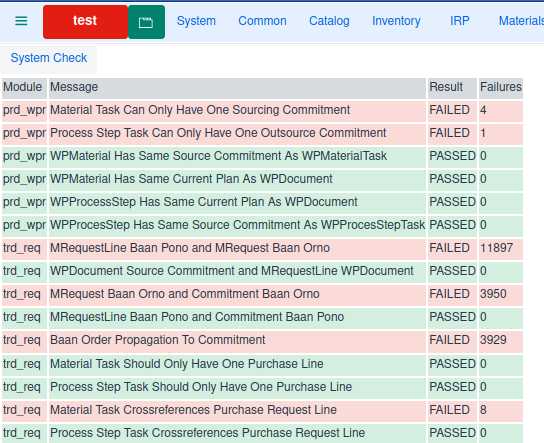
Custom monitoring is additional option during testing of production.
For Wercstat-ERP, a list of "sanity checks" run on a fixed schedule and failures are automatically mailed to support staff.
Integration Test
With almost weekly deployments to operational,
the Wercstat-ERP application has hundreds of integration tests
to ensure the stability of existing functionality.
These test rely on an in-memory database that is created at the start of every test.
To assist in the creation of master test-data, the DSL can
create an import-writer class for entities.
These classes have setters and constructors with primitive types in stead of value-types and entities.
@Service
public class TestDataImport_com_log implements DatabaseInitService {

	@Autowired private COM_LOG_ImportWriter com_log_importWriter;

	@Override
	public void populate() {

		// All Modes
		com_log_importWriter.addTermsOfDelivery(
			TERMS_OF_DELIVERY_EXW,
			"Ex Works",
			PLACE_OF_DELIVERY)
		.user().setExWorks(ExWorks.TRUE);

		com_log_importWriter.addTermsOfDelivery(
			TERMS_OF_DELIVERY_FCA,
			"Free Carrier",
			PLACE_OF_DELIVERY);

		com_log_importWriter.addTermsOfDelivery(
			TERMS_OF_DELIVERY_CPT,
			"Carriage Paid To",
			PLACE_OF_DESTINATION);
		...

		// Sea
		com_log_importWriter.addTermsOfDelivery(
			TERMS_OF_DELIVERY_CFR,
			"Cost and Freight",
			PORT_OF_DESTINATION);

		com_log_importWriter.addTermsOfDelivery(
			TERMS_OF_DELIVERY_CIF,
				"Cost, Insurance and Freight",
				PORT_OF_DESTINATION)
		.user().setTransportMode(SEA);
		...
}
InforLN Interface
To integrate with InforLN ERP the DSL is extended
to declare external tables.
external-table Baan_tdlra011 baanIV external-name "tdlra011" read custom-reader{

	sha key short koor // Order Type  (1) (2)
	sha key int orno   // Order Number
	sha key short pono // Order line

	sha date t_date    PlanDate	(3)
	sha short kotr     // Transacation Type

	sha int leno        // IdNo
        string cprj 6	// Project
        string item 16	SubstrateCode
	sha string dset 11	ItemCode

        short wknr      // Week number
        short ittc      // 1=Standard Item Type
	...
}| 1 | key fields are part of the business key |
| 2 | sha field are included in a checksum calculation to detect changes |
| 3 | field t_date is directly mapped to value-type PlanDate |
The DSL can generate reader and writer classes for the external
database including all required type conversion.
The |